
Configure OpenCode with X-AIO Coding Helper
Use OpenCode 1.18.23 and the current X-AIO Coding Helper 0.9.x release line to configure the X-AIO provider, primary model, and small model, then verify a real request.
This tutorial uses macOS, OpenCode 1.18.23 installed through npm, and the current X-AIO Coding Helper 0.9.x release line. It walks through installing or updating OpenCode, creating and copying an API key from the key list, configuring models, and verifying a real request. The tutorial is compatible with version 0.7.x or later, and installation uses @latest to obtain the newest patch in the current release line.
Before you begin
- Run
xaio-chelperwithout arguments to open Coding Helper's interactive menu. All key, model, and tool configuration in this tutorial is completed from that menu. - OpenCode uses the OpenAI-compatible endpoint
https://llm-api.x-aio.com/v1, which differs from the Anthropic root endpoint used by Claude Code. - The primary and small models in this tutorial are recommended defaults, not requirements. You can select another compatible model from the live list, including other available open-source models.
- All terminal and webpage illustrations below are sanitized SVGs. They contain no real API keys, usernames, or local paths.
1. Prepare Node.js and npm
Coding Helper requires Node.js 18 or later. When installing OpenCode with npm, use a supported Node.js LTS release and check your environment first:
node --version
npm --version
If Node.js is not installed, install the current LTS release from the official Node.js website. This tutorial was tested with Node.js 24.14.1 and npm 11.11.0.
2. Install or update OpenCode
This computer originally installed OpenCode through npm, so use the same channel to update it:
npm install -g opencode-ai@latest
opencode --version
After the update, the test environment reported 1.18.23. If OpenCode is already installed, you can also use its official upgrade command:
opencode upgrade --method npmIf you installed OpenCode with Homebrew, the installation script, or the desktop app, follow the update instructions for that channel in the official OpenCode documentation. Do not mix global installation methods.
3. Create an X-AIO API key and copy it from the list
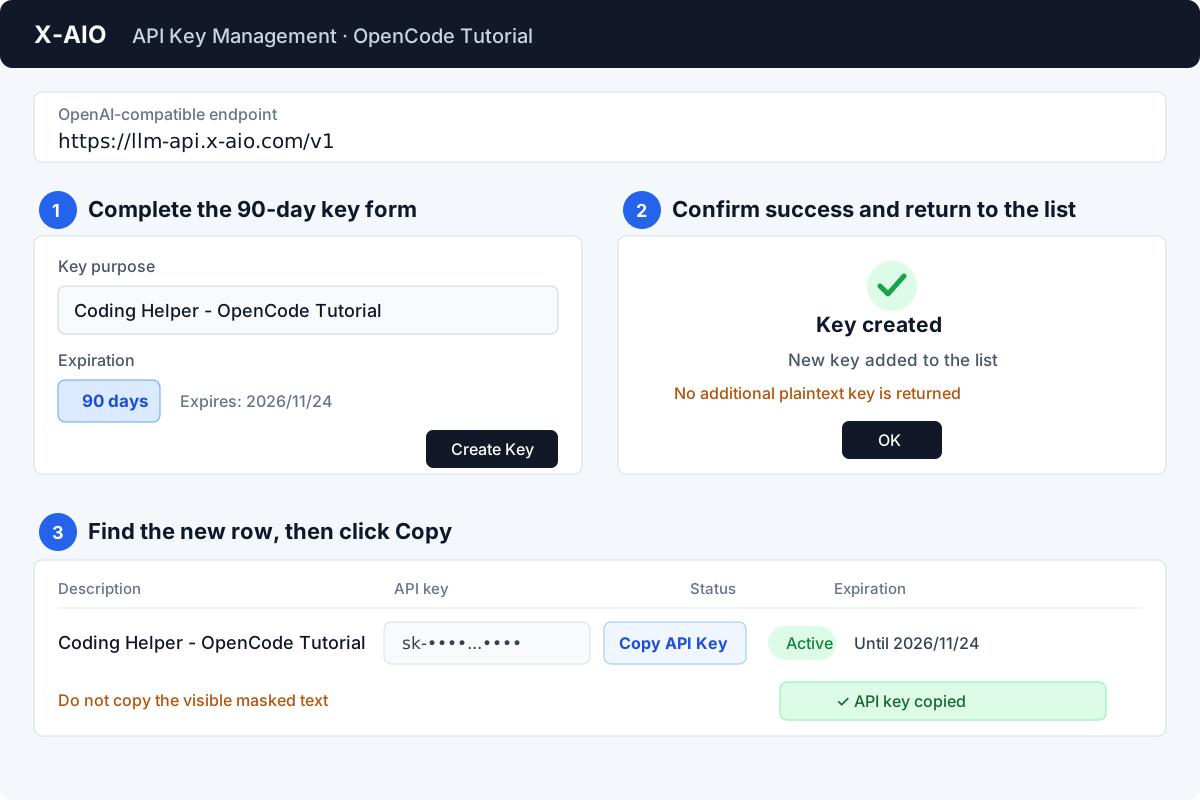
- Open X-AIO API Key Management and sign in to the demo account.
- Confirm that the OpenAI-compatible endpoint shown on the page is
https://llm-api.x-aio.com/v1. - Click Create New Key.
- Enter
Coding Helper - OpenCode Tutorialin the key purpose field. - Select 90 days, confirm the expiration date shown on the page, and click Create Key.
- The success message only confirms that the new key was added to the list; it does not display or return another plaintext key. Click OK to return to the key list.
- Find
Coding Helper - OpenCode Tutorialin the list, confirm that its status is Active, and click Copy API Key in that row.
The new key is not limited to a one-time display during creation. From the list, you can use Show API Key to reveal the full value or Copy API Key to place it directly on the clipboard; this tutorial uses the latter. The list displays a masked value such as sk-••••...•••• by default. Do not copy the masked text you can see on the page.
Protect your key
Do not paste the complete API key into Markdown, screenshots, terminal recordings, Git repositories, or public chats. The helper's key prompt below masks every entered character. If the key has been exposed, delete it from the list immediately and create a replacement.
4. Install Coding Helper and enter the API key
Use @latest to install the current Coding Helper 0.9.x release line. This tutorial requires 0.7.x or later and does not pin a specific patch version:
npm install -g @x-all-in-one/coding-helper@latest
xaio-chelper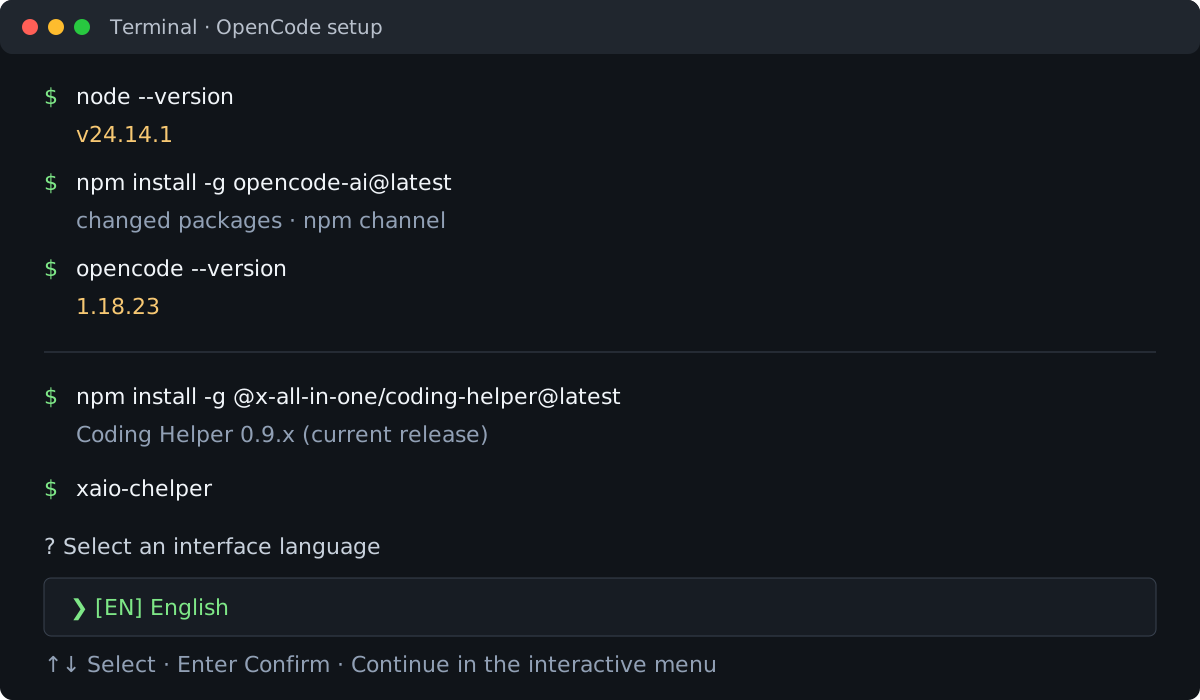
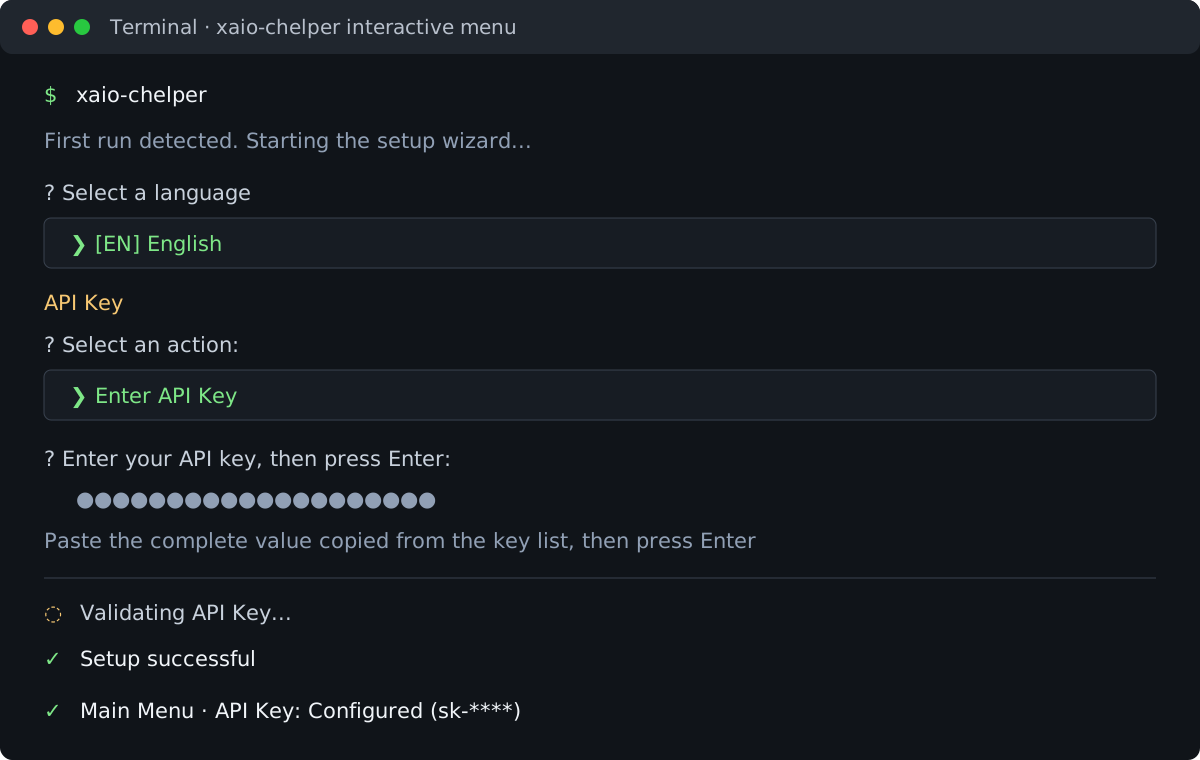
After installation, run xaio-chelper without any arguments. The key and tool configuration steps that follow all take place in its interactive menu. On the first run, proceed in this order:
- Select [EN] English on the language screen and press Enter.
- The wizard automatically opens the API Key page. Select Enter API Key; you do not need to return to the main menu first.
- When you see Enter your API key here and press Enter to confirm:, paste the complete value copied from the key list and press Enter.
- Wait while the helper validates the key through
https://llm-api.x-aio.com/v1/models, then confirm that Setup successful appears. - Back on the main menu, confirm that the API Key status is Configured.
On later runs, xaio-chelper opens the main menu directly. Select Configure API Key → Update API Key. The option is labeled Enter API Key only when no key has been saved. All subsequent Coding Helper operations also continue from this interactive menu.
The helper stores its own configuration in ~/.xaio-chelper/config.yaml. Do not commit this file to a repository.
5. Select the primary and small models
Continue in the Coding Helper interactive wizard that is already open. From the main menu:
- Select Configure Coding Tools.
- Select OpenCode from the tool list.
- From the OpenCode management menu, select Configure Models - (Select primary/small model).
- Under Select Primary Model, choose
deepseek-v4-pro-0813. - Under Select Small Model (fast/lightweight), choose
deepseek-v4-flash-0731. - When prompted with Apply the configuration to OpenCode now? (Y/n), press Enter to accept Yes.
If you already exited Coding Helper, run xaio-chelper again without arguments and follow the same path from the main menu. Do not use a shortcut subcommand to skip the menu.
| OpenCode role | Recommended model | Purpose |
|---|---|---|
| Primary model | deepseek-v4-pro-0813 | Everyday coding, reasoning, and complex tasks |
| Small model | deepseek-v4-flash-0731 | Fast, lightweight supporting tasks |
You can select other open-source models
These two models are only recommended defaults. The model selection page is populated from the live list available to the current API key. Based on speed, capability, and cost, you can select another compatible model from the list for either role, including other available open-source models. Select directly from the list; do not manually enter a model ID that is not listed.
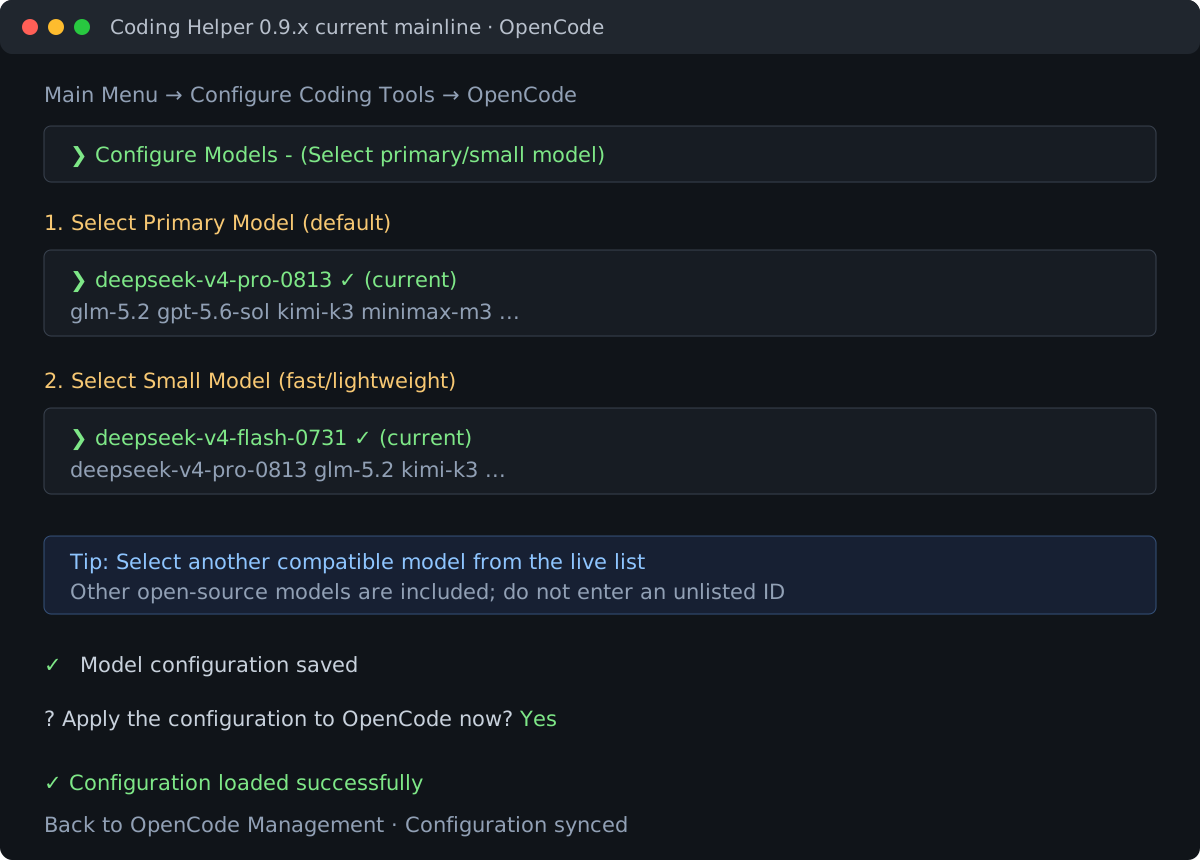
Selecting Yes synchronizes the configuration immediately, so you do not need to run Refresh Configuration manually. When you return to the management menu, confirm that:
- The masked API key prefix is the same under both X-AIO Helper and OpenCode.
- The endpoint is
https://llm-api.x-aio.com/v1. - The primary and small models match your selections.
- The status is
Configuration synced.
Refresh Model List updates OpenCode's catalog of available X-AIO models and normalizes the X-AIO provider metadata and endpoint, but it does not change the current primary or small model. Use Load Configuration or Refresh Configuration from this menu only if you previously selected No, another tool changed the configuration, or the status is inconsistent.
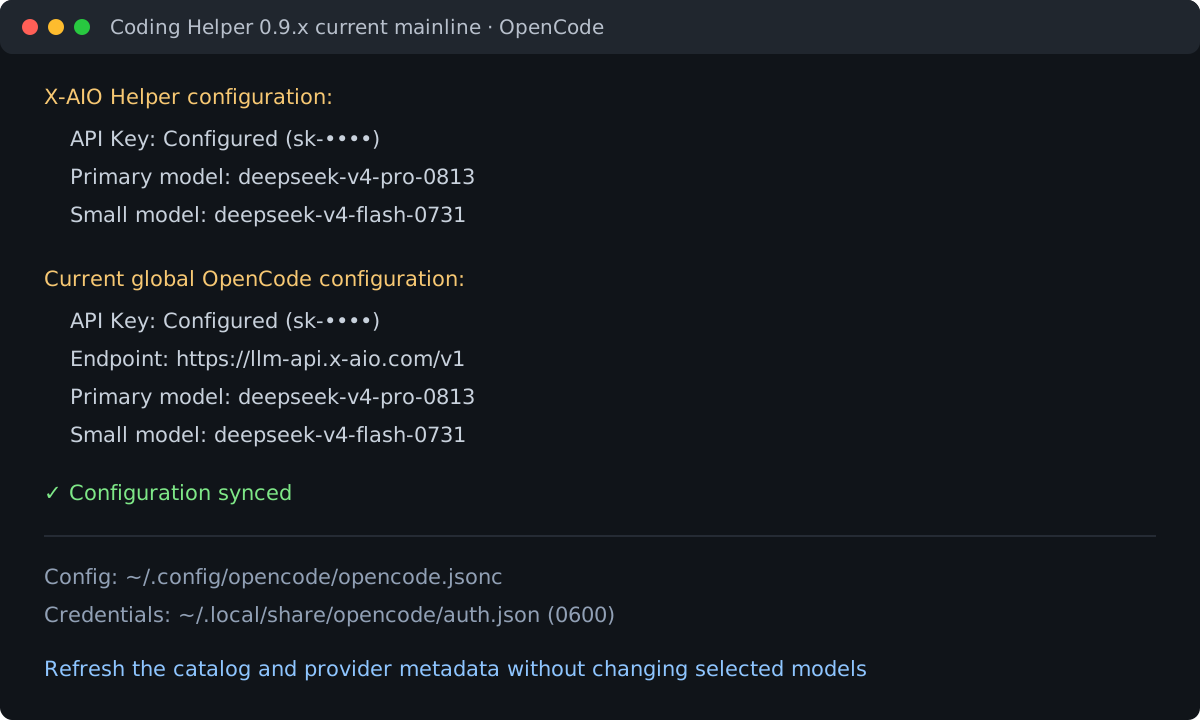
The helper stores public configuration and credentials separately:
| Content | Default location |
|---|---|
| Provider, endpoint, and models | ~/.config/opencode/opencode.jsonc |
| X-AIO API key | ~/.local/share/opencode/auth.json |
On macOS and Linux, the authentication file should have 0600 permissions. A legacy opencode.json is migrated to opencode.jsonc, and a legacy provider.xaio.options.apiKey is removed from the public configuration and written to the authentication file. Other parseable provider and configuration fields are preserved, but JSONC comments may be lost when the file is rewritten.
6. Verify a real request from the OpenCode TUI in an empty directory
Create a new empty directory so the test request cannot access an important project:
demo_dir="$(mktemp -d /tmp/xaio-opencode-demo.XXXXXX)"
original_dir="$PWD"
printf '%s\n' "$demo_dir"
if [ -n "$(ls -A "$demo_dir")" ]; then
  ls -la "$demo_dir"
else
  printf '%s\n' '(empty)'
fi
cd "$demo_dir"
opencode
When the OpenCode TUI opens, complete the verification in the interface:
- Press
Ctrl+X, release the keys, and then pressMto open the model selector. This is the default shortcut in OpenCode 1.18.23. If you changed the key bindings, use the model selection action shown in the interface. - Search for and select
xaio/deepseek-v4-pro-0813, then press Enter. You can instead select another model you configured in Section 5. - Confirm that the selected model appears at the bottom of the TUI, then send:
Reply only with "Configuration successful." Do not create, modify, or delete any files. - Wait for the real request to finish and confirm that the response is
Configuration successful.Seeingxaiomodels in the selector confirms that the provider and model catalog loaded; a successful response also verifies the API key, endpoint, and model request. - When the interface is idle, press
Ctrl+Cto exit OpenCode. You can also pressCtrl+X, release the keys, and then pressQ.
OpenCode saves local sessions in its own user data directory, but this test should not create files in the temporary project directory. Back in the terminal, inspect the directory:
if [ -n "$(ls -A .)" ]; then
  ls -la .
else
  printf '%s\n' '(empty)'
fi
If the output is (empty), the test directory remained empty. If files are listed, inspect their contents and origin before taking any action; do not delete them immediately. Once you have confirmed that the directory is still empty, return to the original directory and remove it:
cd "$original_dir"
rmdir "$demo_dir"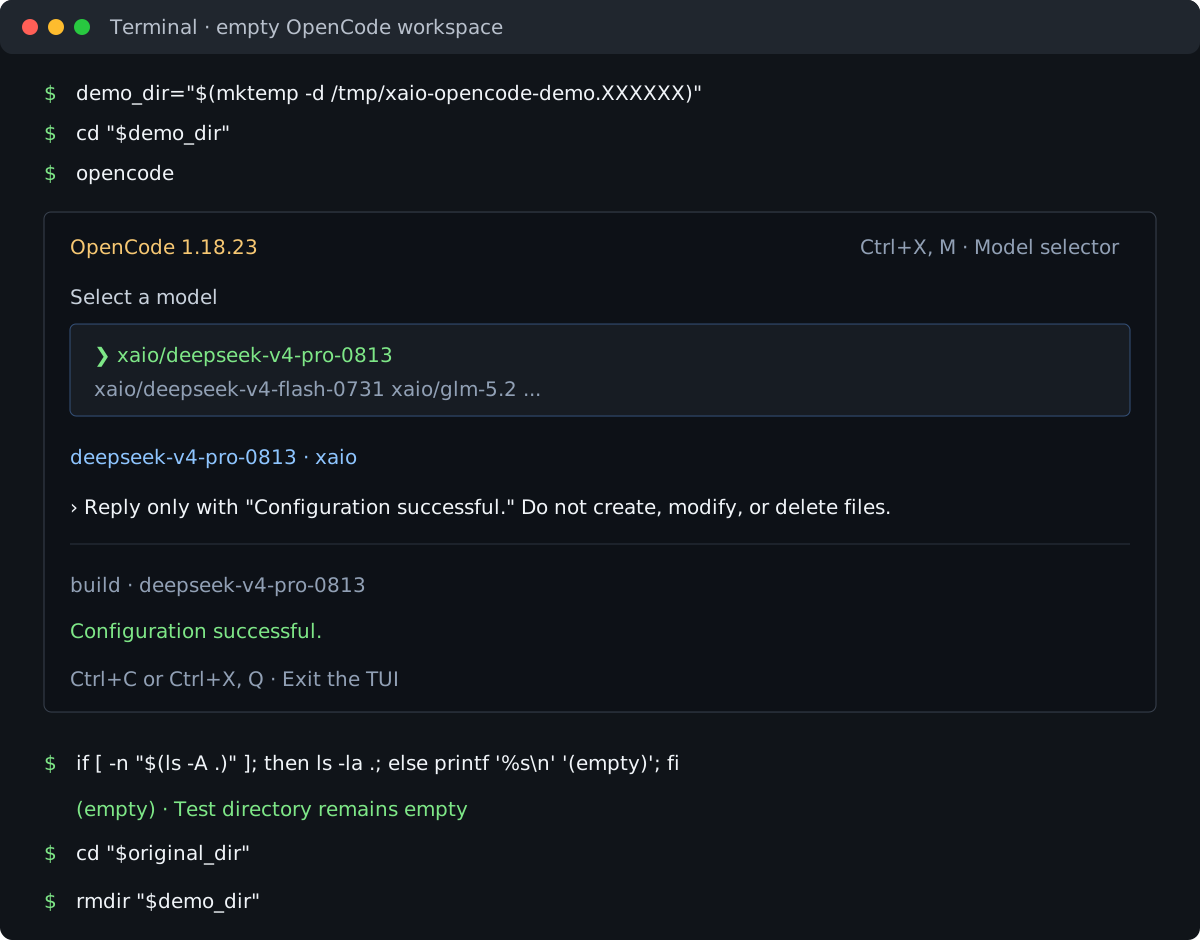
7. Troubleshooting
The OpenCode model selector does not show xaio
Run xaio-chelper without arguments, then select Configure Coding Tools → OpenCode → Load Configuration/Refresh Configuration. When it finishes, restart the OpenCode TUI and check the model selector again.
New models are missing from the list
Run xaio-chelper without arguments, then select Configure Coding Tools → OpenCode → Refresh Model List - (Update available models in configuration). Refreshing does not change the current primary or small model. When it finishes, restart the OpenCode TUI and open the model selector. To change a default model, return to the OpenCode management menu and select Configure Models.
API Key is invalid or expired
- Confirm that you clicked Copy API Key in the intended key's row rather than copying the masked text displayed on the page.
- After creating a key, wait briefly, run
xaio-chelperwithout arguments, and select Configure API Key → Update API Key to paste it again. - Check the key's expiration date and workspace. If necessary, delete the old key and create a new key with a limited lifetime.
The configuration still uses a legacy endpoint
The X-AIO provider's baseURL should be:
https://llm-api.x-aio.com/v1If it still shows https://code-api.x-aio.com/v1 or another legacy address, run xaio-chelper without arguments and select Configure Coding Tools → OpenCode → Refresh Configuration.
8. Official references
Configure Claude Code with CC Switch
Install CC Switch and Claude Code on macOS, then import an X-AIO provider configuration with one click.
Configure Codex with X-AIO Coding Helper
Use an official Codex installation method and the current X-AIO Coding Helper 0.9.x release line to configure a Responses provider, select a model, and verify your first request.