
Configure Codex with X-AIO Coding Helper
Use an official Codex installation method and the current X-AIO Coding Helper 0.9.x release line to configure a Responses provider, select a model, and verify your first request.
This tutorial uses macOS, the current Codex CLI (example version 0.149.1), and the current X-AIO Coding Helper 0.9.x release line to walk through installation, API key creation and copying, key entry, model selection, global configuration review, and your first verified request. It is compatible with version 0.7.x or later. The installation command uses @latest to get the newest patch in the current release line. Within the same operating-system user environment, the Codex CLI, IDE extension, and desktop app share user-level configuration. The Windows desktop app and WSL use different CODEX_HOME directories by default; see Section 8 for the exception. If you are signed in to Codex or have an active Codex session, exit it before starting these configuration steps.
Read this before you begin
- OpenAI's official list of supported countries and territories does not include every region. Accessing or providing access from an unlisted region may result in an account being blocked or suspended. A proxy can improve network connectivity, but it cannot change regional policy or guarantee account safety or availability. Comply with applicable local laws and OpenAI's terms of service.
- The official Coding Helper command is
xaio-chelper.coding-helperis a legacy compatibility alias; do not usexaio-coding-helperas the package or command name. - This tutorial uses X-AIO's OpenAI Responses-compatible endpoint at
https://llm-api.x-aio.com/v1. A custom Codex provider requireswire_api = "responses". Coding Helper initially filters Responses-compatible candidates by model metadata, but a real request remains the final compatibility check. - All terminal and web illustrations in this tutorial are sanitized SVG mockups. Never include a real API key, browser address bar, or complete configuration file in a screenshot, chat, support ticket, or Git repository.
1. Prepare Node.js and npm
Coding Helper requires Node.js 18 or later. If you use the fallback npm installation method for Codex, use a supported Node.js LTS release. First, check your local environment:
node --version
npm --version
If Node.js is not installed, install the current LTS release from the official Node.js website. Codex's native installer does not require Node.js, but Coding Helper still does.
2. Install or update Codex using an official method
macOS, Linux, or WSL
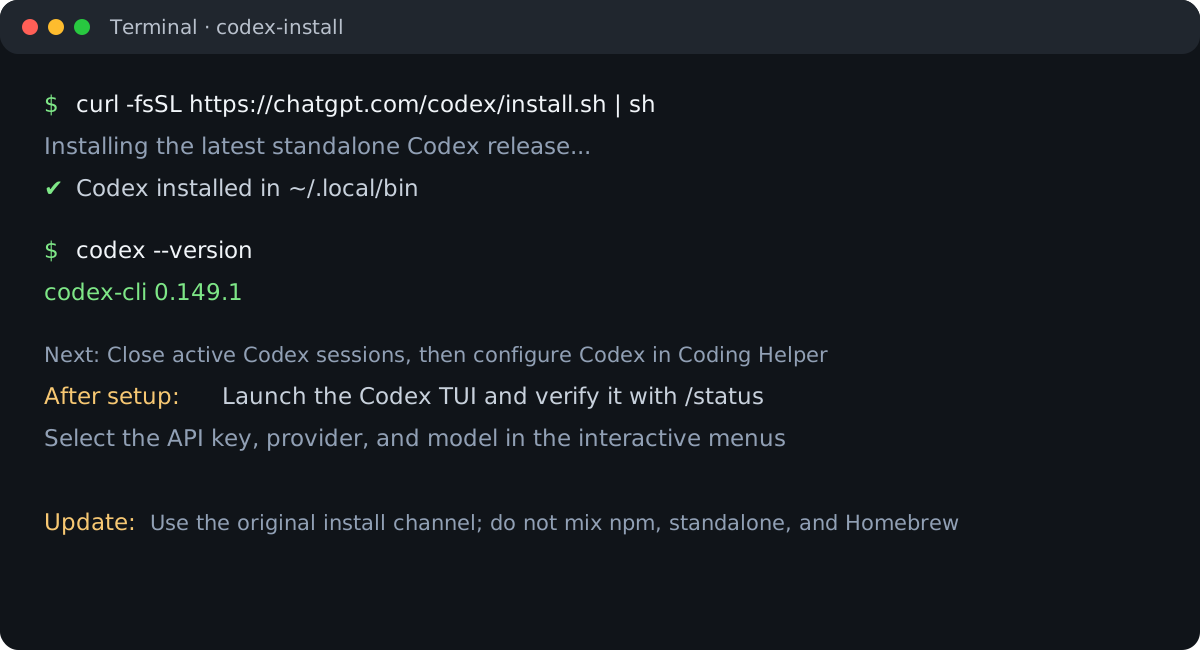
The standalone installer is currently the preferred official method. Run this command in a terminal:
curl -fsSL https://chatgpt.com/codex/install.sh | shWhen installation finishes, reopen the terminal and check the version:
codex --versionIf the terminal reports codex: command not found, follow the installer's final Next steps to add its installation directory to PATH. Do not copy another computer's /opt/homebrew, /usr/local/bin, or ~/.local/bin path into your configuration.
Windows PowerShell
Open PowerShell as a standard user and run:
powershell -ExecutionPolicy ByPass -c "irm https://chatgpt.com/codex/install.ps1 | iex"Then reopen PowerShell and run codex --version.
Homebrew on macOS
If you already use Homebrew to manage command-line tools, install the official cask:
brew install --cask codex
codex --version
Continue using the same channel for future updates:
brew upgrade --cask codexnpm fallback
If your team standardizes on npm or you cannot use the standalone installer, run:
npm install -g @openai/codex@latest
codex --version
Continue using your original installation channel for updates. Standalone users should rerun the official installation command:
curl -fsSL https://chatgpt.com/codex/install.sh | shnpm users should rerun the npm install -g @openai/codex@latest command above. On a computer where Codex was installed with the standalone installer or Homebrew, do not use the Codex update option in Coding Helper to force a switch to npm. This tutorial uses only the official installer or the original installation channel.
Homebrew users should run brew upgrade --cask codex. If you are unsure how Codex was installed, run command -v codex and codex --version first, then update through the original channel.
3. Create an X-AIO API key and copy it from the list
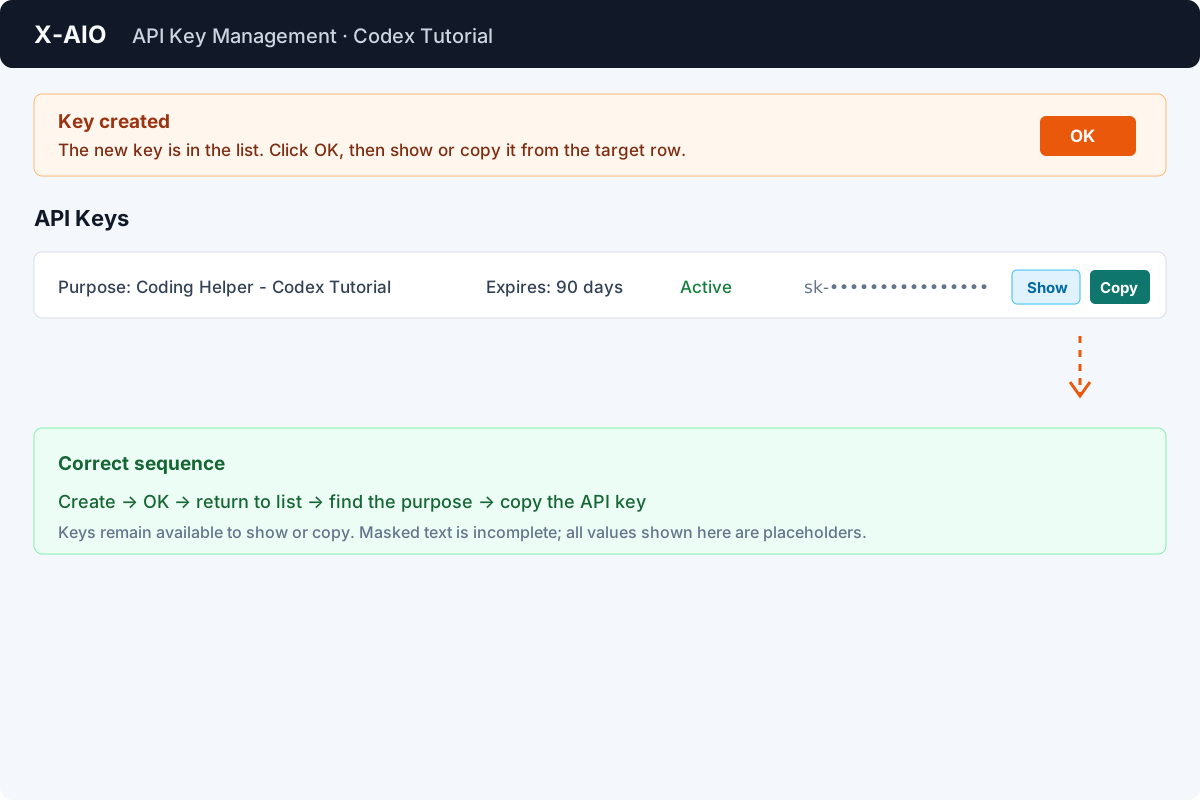
- Open X-AIO API Key Management in Chrome and sign in to the demonstration account.
- Click Create New Key.
- Enter an easy-to-recognize name under Key Purpose, such as
Coding Helper - Codex Tutorial. - Select an expiration period. 90 days is recommended; do not create a permanent key for a tutorial or temporary test.
- Click Create Key and wait for the success message.
- Click OK in the message to return to the API key list.
- Find
Coding Helper - Codex Tutorialin the list, confirm that its status is Active, and click Copy API Key in that row. If you need to compare it manually, use Show API Key, then hide it again immediately.
A newly created key is not available only at the instant it is created. The correct sequence is: create the key, close the success message, return to the list, find the target row, and copy the API key. The masked value in the list, such as sk-••••...••••, is not the complete key and cannot be pasted into Coding Helper.
Protect your key
Do not paste the complete key into Markdown, a terminal recording, a Git repository, or a public chat. The Coding Helper field below masks all characters. If the key has been exposed, immediately delete it from the list and create a new time-limited key.
4. Install Coding Helper and enter the key
Use @latest to install the current Coding Helper 0.9.x release line. This tutorial requires 0.7.x or later and does not pin a specific patch version:
npm install -g @x-all-in-one/coding-helper@latestnpm's @latest tag installs the current stable release. This tutorial requires 0.7.x or later but is not tied to a fixed patch. After installation, run only the official command with no arguments to start the full interactive wizard:
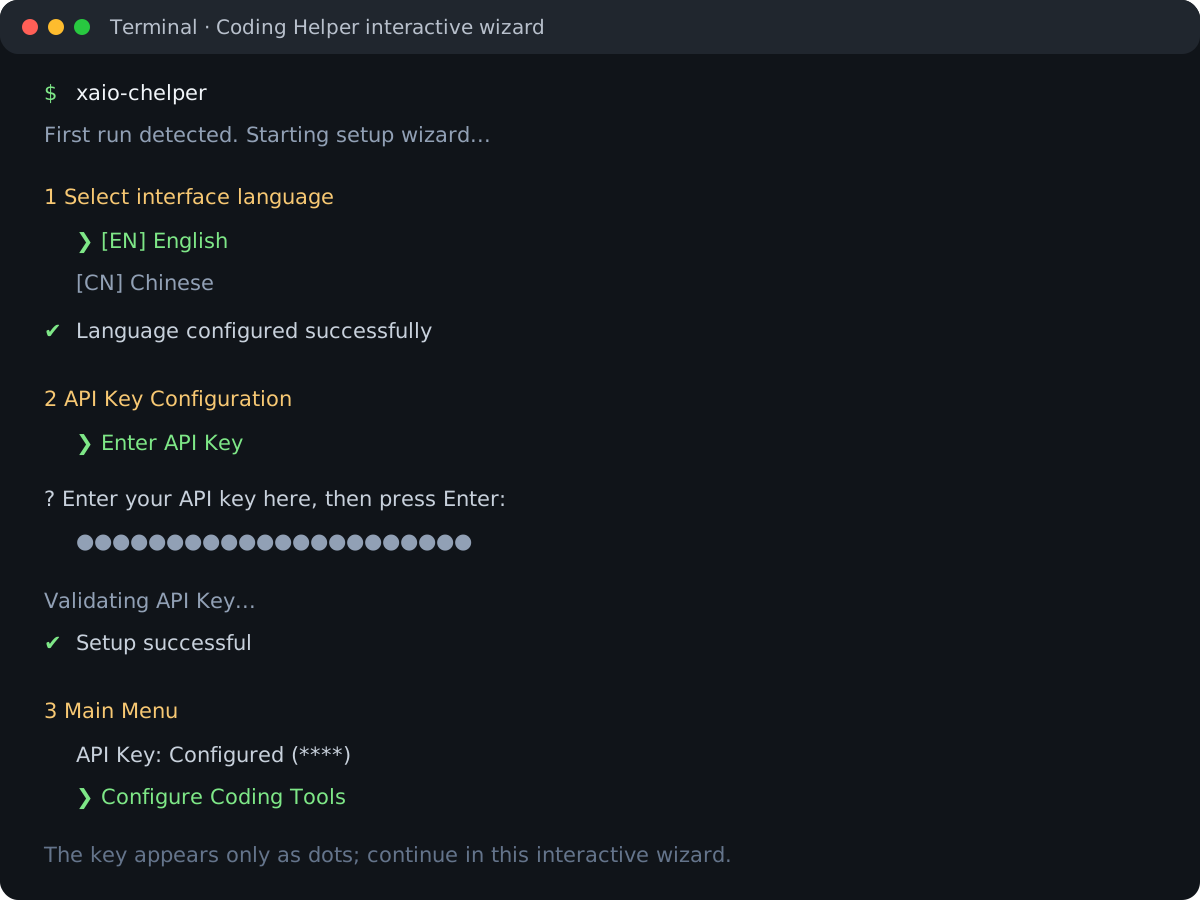
xaio-chelperOn the first run, complete these steps in order:
- Select [EN] English on the first language screen and press Enter.
- The wizard then opens API Key Configuration. Select Enter API Key.
- At the Enter your API key here, then press Enter: prompt, paste the complete value copied from the target row in the API key list, then press Enter.
- Wait for Coding Helper to validate the key through
https://llm-api.x-aio.com/v1/models, and confirm that it displays Setup successful. - Return to the main menu and verify that API Key shows Configured.
If this is not the first run, Coding Helper opens the main menu directly. Select Configure API Key -> Update API Key. The option is labeled Enter API Key only when no key has been saved. Continue all later configuration in this interactive wizard; do not use shortcut subcommands.
Every time this tutorial tells you to reopen Coding Helper, run only xaio-chelper, then follow the menu path shown on the page.
Coding Helper stores its own configuration in ~/.xaio-chelper/config.yaml. Do not commit this file to a repository. The API key is never echoed in the terminal.
5. Select a Codex model and sync it immediately
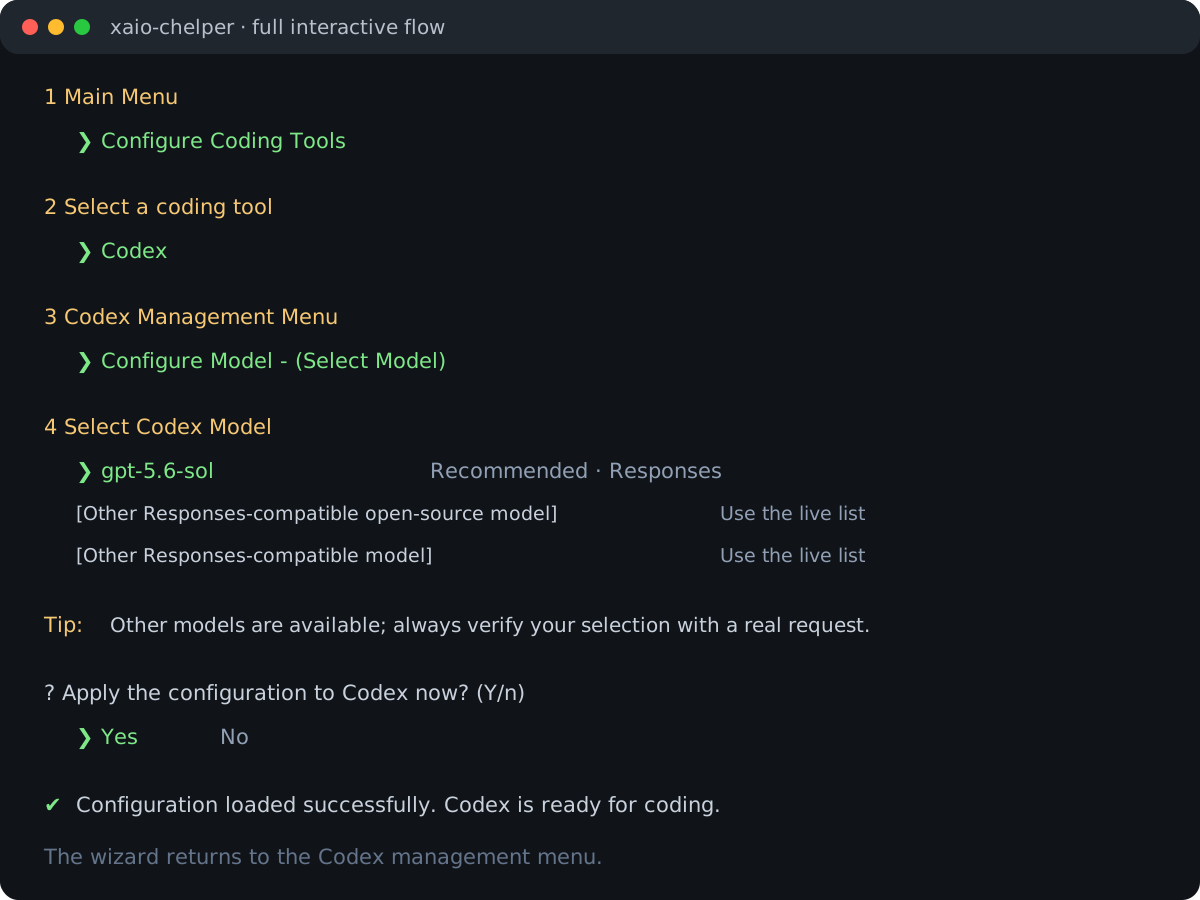
Continue in the interactive wizard that is already open. From the main menu, follow these steps:
- Select Configure Coding Tools.
- Select Codex from the tool list.
- Select Configure Model - (Select Model) from the Codex management menu.
- Select
gpt-5.6-solfrom the live model list. This tutorial recommends it as the default. - When asked Apply the configuration to Codex now?, press Enter to accept the default Yes.
- Wait for Coding Helper to load the configuration and return to the Codex management menu.
If the menu reports that Codex is not installed, go back and exit Coding Helper, complete the official installation in Section 2, then run xaio-chelper and follow the same menu path again. This avoids accidentally switching a standalone or Homebrew installation to npm.
You can also select another open-source model
gpt-5.6-sol is the recommended default, not the only option. Based on speed, capability, and cost, you can select another open-source model or a model from another provider in the Codex model picker. Coding Helper uses model metadata and compatibility rules from the endpoint to show only Responses-compatible candidates, but metadata filtering does not replace a real Codex request. If you choose another model, complete Section 7 and do not manually enter a model ID that does not appear in the picker.
6. Review synchronization status and secure writes
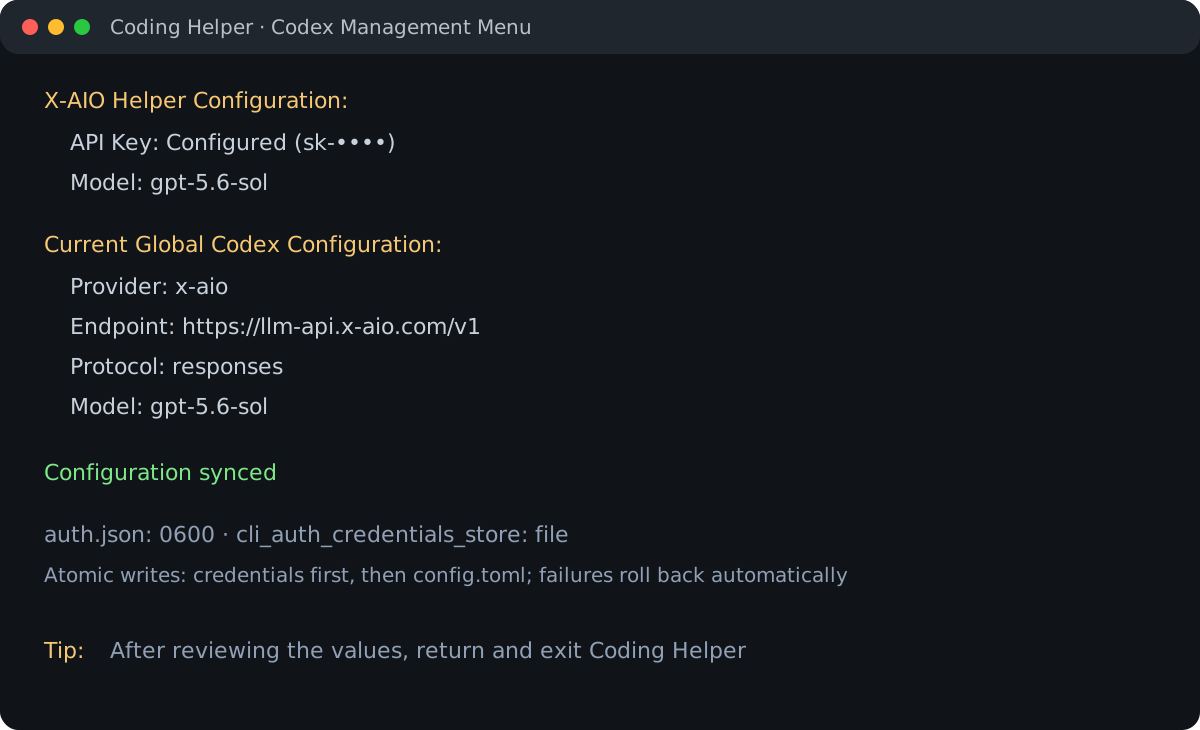
After returning to the Codex management menu, you should see:
| Setting | Expected value |
|---|---|
| Provider | x-aio |
| API endpoint | https://llm-api.x-aio.com/v1 |
| Model | gpt-5.6-sol, or the model you selected in the previous step |
| Wire protocol | responses |
| Status | Configuration synced |
Coding Helper stores public configuration separately from credentials:
| Content | Default location |
|---|---|
| Provider, endpoint, and model | $CODEX_HOME/config.toml |
| API key | $CODEX_HOME/auth.json |
When CODEX_HOME is not set, it defaults to ~/.codex. If you have set CODEX_HOME, Coding Helper uses that directory instead of writing to a different home directory. The directory must already exist and belong only to the current user.
Coding Helper writes the X-AIO provider to the user-level $CODEX_HOME/config.toml, allowing the CLI, IDE extension, and desktop app in the same user environment to share it. A trusted project's .codex/config.toml still participates in Codex configuration precedence and may override the user-level model or model_provider. If X-AIO is not used in a particular project, first check whether that project contains an intentional local override. Never put the API key in project configuration.
To make file updates recoverable, version 0.7.x and later first acquire a lock in the same directory and strictly parse snapshots of config.toml, auth.json, and the internal state file. They then write credentials and configuration through temporary files and atomic replacement. Coding Helper checks the snapshots again before writing. If a step fails and there was no external modification, it restores the snapshots; if it detects a concurrent change, it stops the restore and reports a conflict. An existing configuration that cannot be parsed is never overwritten with an empty object. auth.json and the internal state file are treated as password files and receive 0600 permissions. Coding Helper also sets the Codex credential store to file, ensuring that the API key you just copied is not ignored on a system configured to use only the keyring. On uninstall, it restores the credential-storage setting and API key from before it took over.
Within the same operating-system user environment, the Codex CLI, IDE extension, and desktop app share user-level configuration. The Windows desktop app and WSL use separate CODEX_HOME directories by default. To share a configuration, explicitly point WSL to the Windows Codex directory and verify that its path and permissions work. Close all running Codex processes before configuration. Do not demonstrate this tutorial against the active Codex session's own ~/.codex, and do not interfere with a running session by temporarily changing HOME or CODEX_HOME. For a demonstration or troubleshooting, use an isolated test directory and an explicit temporary configuration path, then remove the temporary files afterward.
7. Verify a real request in an empty directory
Create a new empty directory first so that the test request cannot touch an important project:
demo_dir="$(mktemp -d /tmp/xaio-codex-demo.XXXXXX)"
printf '%s\n' "$demo_dir"
if [ -n "$(ls -A "$demo_dir")" ]; then
  ls -la "$demo_dir"
else
  printf '%s\n' '(empty)'
fi
Save the current directory, enter the temporary directory you just created, and start the Codex interactive interface in a read-only sandbox:
original_dir="$PWD"
cd "$demo_dir"
codex --sandbox read-only -m gpt-5.6-sol
If you selected a model other than gpt-5.6-sol in the previous step, replace the model ID after -m with the one you selected.
In the Codex TUI:
- Enter
/statusand press Enter. Confirm that the active model is the one you selected, the current directory is the temporary directory, and the sandbox mode is read-only. - Enter
Reply only with "Configuration successful." Do not create, modify, or delete any files.and press Enter. - After receiving
Configuration successful., enter/exitand press Enter to quit Codex.
-m and --sandbox apply only to this launch and do not rewrite the global Codex configuration. The read-only sandbox also prevents the model from writing to the demonstration directory. A real request consumes API quota. If it returns 402, check your credits in the Tokens Plan Subscription Overview, then verify the API key's expiration and model availability before treating the response as a configuration problem.
Back in the shell, confirm that the temporary directory is still empty:
if [ -n "$(ls -A .)" ]; then
  ls -la .
else
  printf '%s\n' '(empty)'
fi
An (empty) result confirms that the verification directory was not modified. If files are listed, stop and review the request arguments and sandbox settings. When the check is complete, remove the temporary directory:
cd "$original_dir"
rmdir "$demo_dir"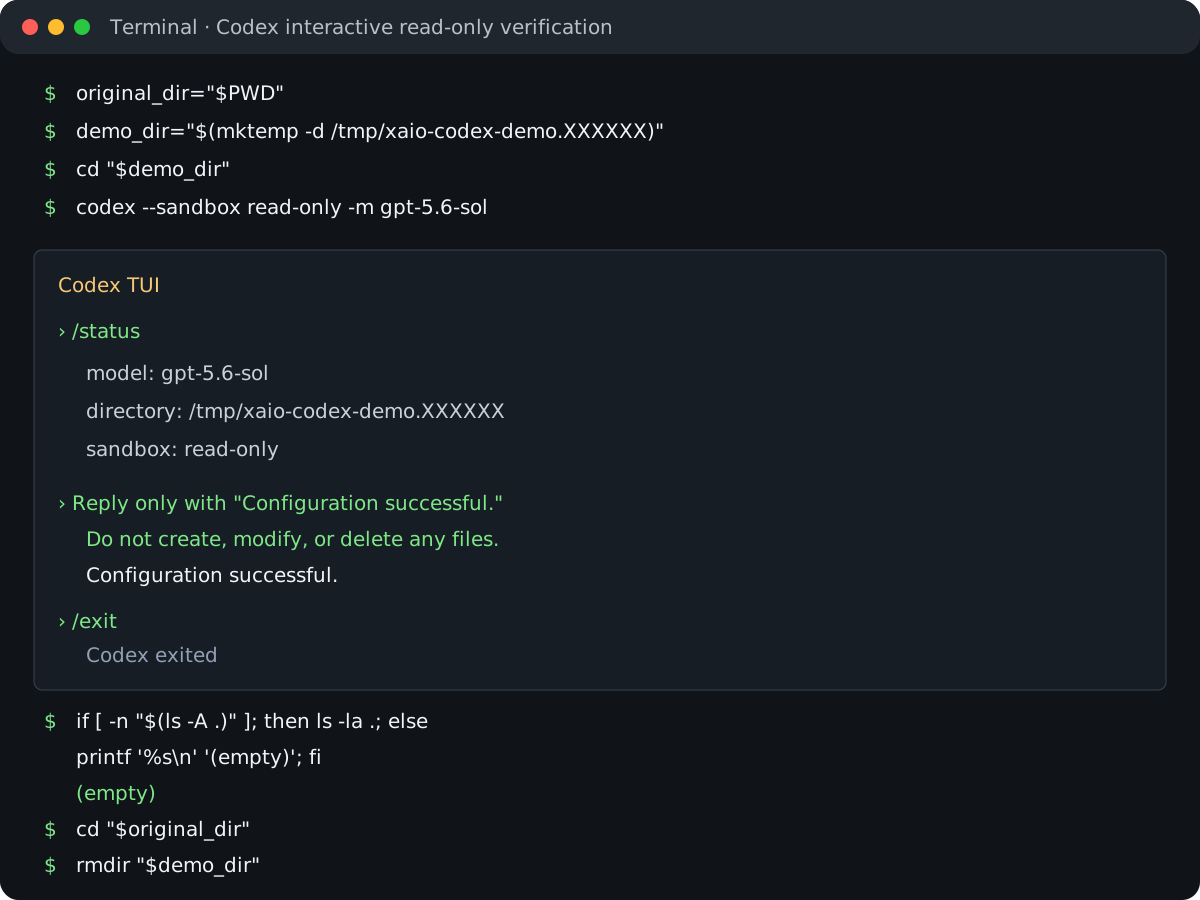
8. Troubleshooting
The menu shows "Configuration not loaded" or "Configuration out of sync"
Confirm that the Codex management menu shows x-aio as the provider, https://llm-api.x-aio.com/v1 as the endpoint, responses as the protocol, and the same model selected in Coding Helper. Upgrade to Coding Helper 0.7.x or later, run xaio-chelper again, then select Configure Coding Tools -> Codex.
Select Load Configuration or Refresh Configuration in the Codex management menu, depending on the current status. Recent versions check the provider, API key, model, endpoint, and Responses protocol together, so a match on only the API key and model cannot be incorrectly reported as synchronized.
The Codex TUI reports that you are signed out or authentication is unavailable
Check that $CODEX_HOME/auth.json exists with 0600 permissions and that config.toml contains:
cli_auth_credentials_store = "file"If you manually set credential storage to keyring, Codex does not read the auth.json written by Coding Helper. Run the Coding Helper Codex configuration flow again, or select a credential-storage method from the official Authentication documentation. Do not put the API key in a project-level .codex/config.toml.
API Key is invalid or expired
- Confirm that you copied the complete value from the target row in the API key list rather than the masked text.
- After creating a key, wait briefly, run
xaio-chelper, and select Configure API Key -> Update API Key from the main menu to paste it again. - Check the key's expiration, workspace, and available credits. If necessary, delete the old key and create a new 90-day key.
The model does not exist, the wire protocol is incompatible, or the request returns 400
The model list changes over time and by plan or upstream provider. Coding Helper filters Responses candidates using metadata and compatibility rules returned by the endpoint. If an expected model is missing, it may support only Chat Completions. Reopen Configure Model to retrieve the live list, then verify a candidate with the read-only request in Section 7. Do not force a Chat Completions-only model into Codex; wire_api = "chat" is not a valid alternative for a current custom Codex provider.
Codex cannot find the configuration after CODEX_HOME is set
Verify that the environment variable points to an existing absolute directory. In the same terminal, run:
printf '%s\n' "$CODEX_HOME"
ls -l "$CODEX_HOME/config.toml" "$CODEX_HOME/auth.json"
The CLI, IDE extension, and Coding Helper must use the same CODEX_HOME. Do not overwrite the current session's environment variable for testing. Use a separate temporary directory and remove it after verification.
On Windows with WSL, the Windows desktop app uses %USERPROFILE%\.codex by default, while WSL uses ~/.codex in the Linux home directory. They do not share configuration automatically. To share it, set CODEX_HOME in WSL to an accessible Windows path as described in the official documentation, for example:
export CODEX_HOME=/mnt/c/Users/<windows-user>/.codexAfter confirming the path and permissions, restart Coding Helper, the CLI, and the desktop app.
9. Official references
Configure OpenCode with X-AIO Coding Helper
Use OpenCode 1.18.23 and the current X-AIO Coding Helper 0.9.x release line to configure the X-AIO provider, primary model, and small model, then verify a real request.
Configure Codex with CC Switch
Install Node.js, Codex, and CC Switch on macOS, then import and verify an X-AIO provider configuration with one click.