
Configure Codex with CC Switch
Install Node.js, Codex, and CC Switch on macOS, then import and verify an X-AIO provider configuration with one click.
CC Switch is an open-source provider configuration manager for AI coding tools. This tutorial is intended for first-time command-line users. Using macOS, CC Switch 3.20.0, Node.js 24.14.1, and Codex CLI 0.149.1, it walks through installation, one-click X-AIO configuration import, model selection, and the first verification request.
Windows users should download the Windows installer for CC Switch and follow the installation wizard. Node.js can be installed with the installer from its official website. The rest of this tutorial uses macOS. Button locations may vary slightly between Windows and macOS or across CC Switch versions, but the overall process is the same.
Important information for users in mainland China
OpenAI's official list of supported countries and territories currently does not include mainland China and states that accessing or providing access from an unlisted region may result in an account being blocked or suspended. Accessing official Codex pages, downloading the software, or completing first-time initialization may require a VPN or proxy. A proxy can improve network connectivity, but it cannot change regional policy or guarantee account safety or availability. Comply with applicable local laws and OpenAI's terms of service.
Before you begin
Sign in to the X-AIO Tokens Plan API key page in Chrome. This tutorial never asks you to reveal the complete API key. Do not click the eye icon beside the key or include the key or one-click setup link in a screenshot, chat, or code repository.
1. Download and install CC Switch on macOS
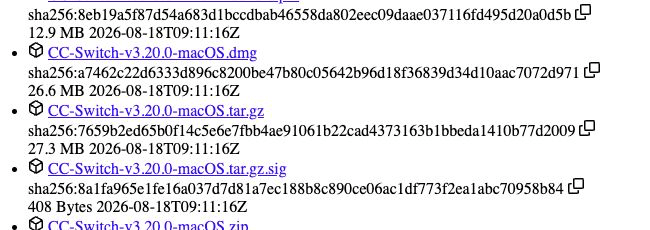
Download the latest macOS .dmg from the official CC Switch download page or GitHub Releases. The CC-Switch-v3.20.0-macOS.dmg tested for this tutorial is a universal installer that supports both Apple silicon and Intel processors.
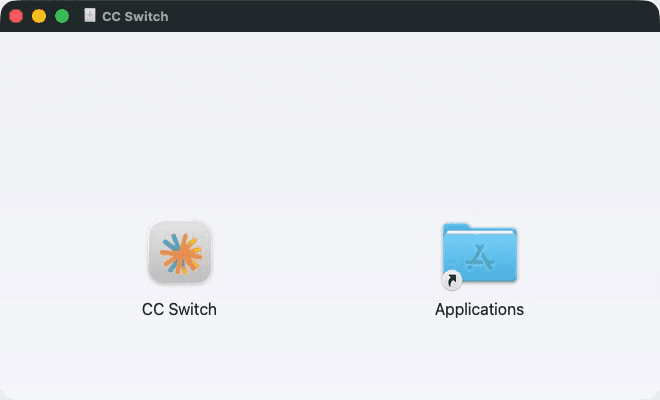
When the download finishes, double-click the .dmg, then drag the CC Switch icon into the Applications folder.
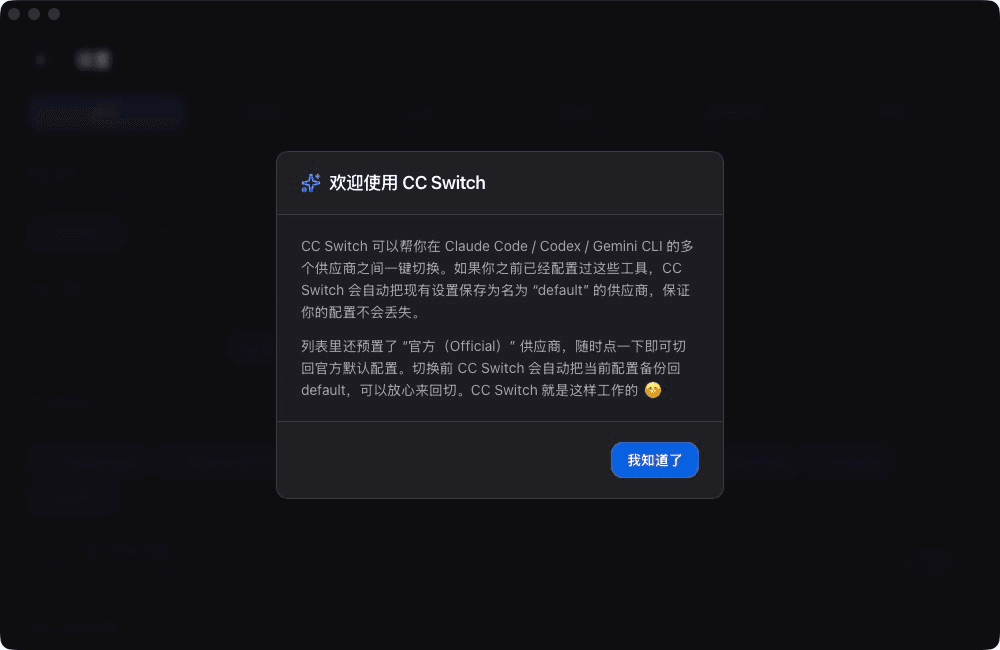
Open CC Switch from Applications. If macOS warns that the app was downloaded from the internet, verify the app name and click Open. A welcome window appears on the first launch. Read the notice and click I understand (我知道了).
Installation security
If macOS says the app is damaged or cannot verify the developer, stop the installation and download the latest release again from the official CC Switch GitHub repository. Do not disable Gatekeeper or use commands to bypass macOS security checks.
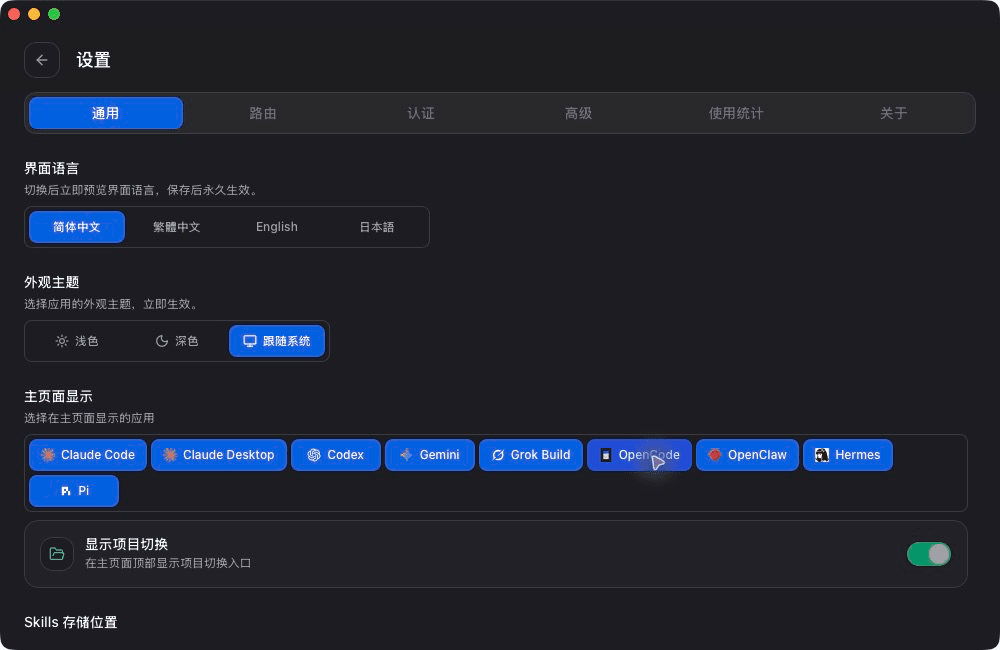
2. Switch the interface to Simplified Chinese
The screenshots and exact button labels in this tutorial use the Simplified Chinese interface:
- Click Settings (
设置, the gear icon) in the upper-left corner of CC Switch. - Open General (
通用). - Select Simplified Chinese (
简体中文) under Interface Language. If it is already selected, return to the previous screen.
3. Install Homebrew and Node.js 24
CC Switch installs Codex through the official npm package, so Node.js and npm must be available on macOS first. Open Terminal and complete the following steps in order.
Install Command Line Tools for Xcode
xcode-select --installmacOS opens an installation window. Follow the system prompts to complete installation. Some steps may require an administrator password.
Install Homebrew
If Homebrew is not installed, run the command from the Homebrew website:
/bin/bash -c "$(curl -fsSL https://raw.githubusercontent.com/Homebrew/install/HEAD/install.sh)"When installation finishes, the terminal displays Next steps. Run each command shown there to add Homebrew to PATH. The path differs between Mac processor types, so do not copy a path from another computer. Then verify the installation:
brew --versionInstall Node.js 24 with Homebrew
brew install node@24Add Node.js 24 to the current user's PATH, then reload the terminal configuration:
echo 'export PATH="$(brew --prefix node@24)/bin:$PATH"' >> ~/.zshrc
source ~/.zshrc
Finally, check the versions:
node --version
npm --version
Node.js v24.x.x and an npm version number indicate that the environment is ready. This tutorial was tested with Node.js v24.14.1 and npm 11.11.0; a newer patch version is normal.
4. Install Codex in CC Switch
- In CC Switch, open Settings -> About (
设置 -> 关于). - Find Codex under Local Environment Check.
- If Current Version shows Not Installed, click Install in the lower-right corner of the card.
- Wait for installation to finish, then click Refresh to the right of Local Environment Check.
A green check mark with current and latest version numbers on the Codex card indicates a successful installation. This tutorial was tested with version 0.149.1.
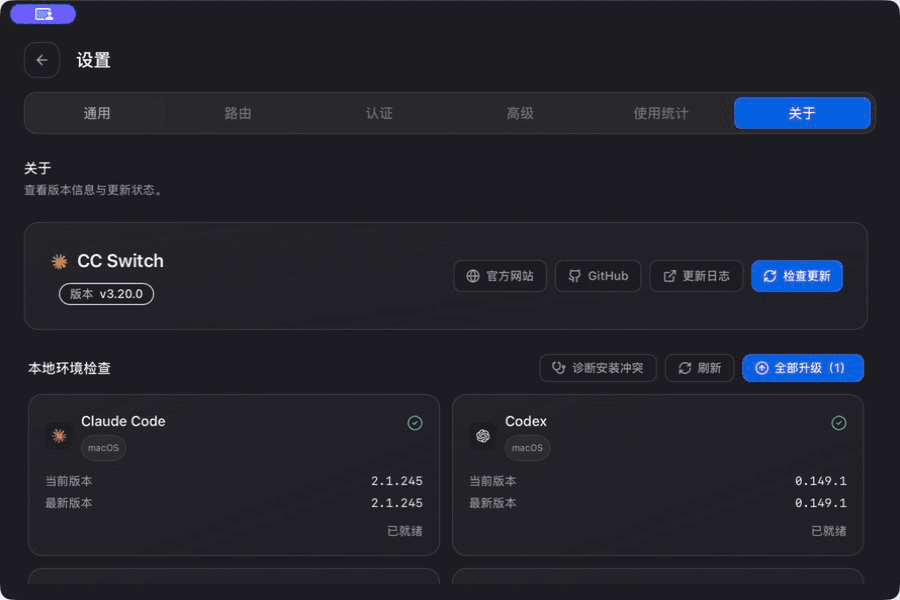
If installation through CC Switch fails, use the npm method from the official OpenAI Codex CLI documentation, then return to CC Switch and refresh the environment check:
npm install -g @openai/codex
codex --version
Do not add sudo before the npm command. If the terminal reports that it cannot write to the installation directory, fix the Node.js or npm installation path instead of granting broader system permissions.
5. Create a dedicated X-AIO API key
Open the X-AIO API key page, click Create New Key, and use the following example values:
- Key purpose:
CC Switch - Codex. - Expiration: 90 days. A permanent key is not recommended for a temporary device.
- Review the values and click Create Key.
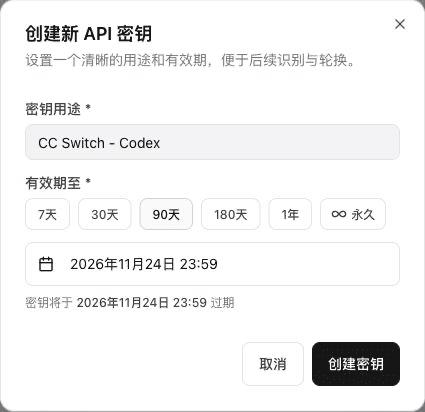
You do not need to copy or reveal the key after creating it. In the next step, X-AIO's one-click integration passes the configuration directly to CC Switch on this computer.
6. Import the configuration into CC Switch with one click
Find the action area to the right of the API key in the card you just created.
This small button is easy to miss
Click the One-click Client Setup icon at the far right of the key's action area. It looks like a branching node. It is neither the copy button nor the eye icon.
The one-click setup link is also sensitive
Click the one-click setup option only on your own computer. Do not copy, share, or screenshot the link, and do not include the browser address bar in a screenshot. The link contains the API key used for import, so exposing the link exposes the key.
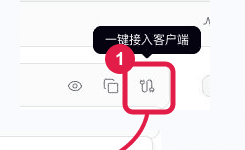
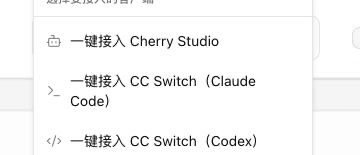
From the expanded menu, select One-click Setup for CC Switch (Codex). Do not select the Claude Code option.
Chrome then asks for permission to open an external application. Click Open CC Switch so the browser can pass the configuration to the installed app. You do not need to select Always allow.
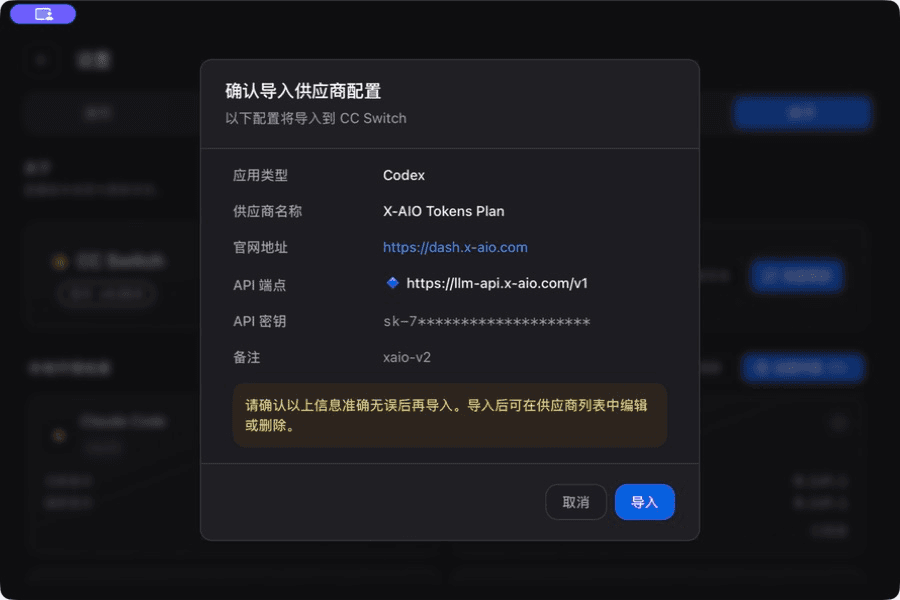
When CC Switch opens the Confirm Provider Configuration Import window, verify each field:
| Setting | Expected value |
|---|---|
| Application type | Codex |
| Provider name | X-AIO Tokens Plan |
| Website | https://dash.x-aio.com |
| API endpoint | https://llm-api.x-aio.com/v1 |
| API key | Keep it hidden; do not click or reveal it |
| Notes | xaio-v2 |
Codex uses an OpenAI Responses-compatible API, so keep /v1 at the end of the endpoint. After confirming the values, click Import.
7. Confirm that the provider is enabled and select an available model
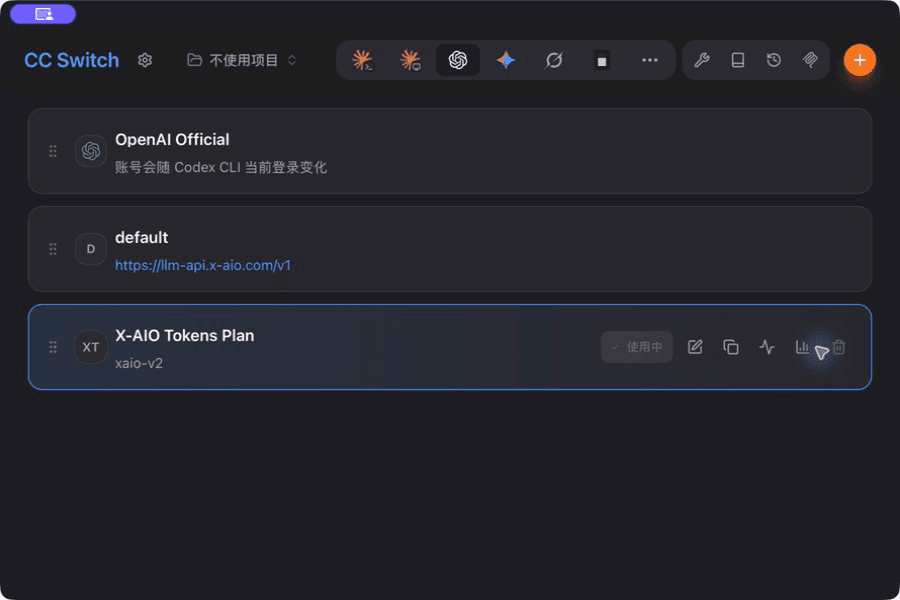
After the import finishes, return to the CC Switch home screen and select Codex at the top. One-click import in CC Switch 3.20.0 automatically enables the new provider. A blue border and In Use (使用中) on the X-AIO Tokens Plan card indicate that the switch succeeded. In an older version that does not enable it automatically, click Enable (启用) on the right side of the card.
Always verify the model after import
In CC Switch 3.20.0, the one-click Codex import may initially set gpt-5-codex. During testing for this tutorial, X-AIO returned "model does not exist" for that model. Model availability changes over time and by plan, so do not copy the name of a model that is no longer available.
Select a currently available model as follows:
- Move the pointer over the
X-AIO Tokens Plancard and click Edit (编辑, the pencil icon) on the right. - Click Get Model List (
获取模型列表) to the right of Default Model. - Expand Select Model and choose an available model from the list you just retrieved. This tutorial uses
gpt-5.6-sol. - Keep the API endpoint set to
https://llm-api.x-aio.com/v1and the upstream format set to Responses (Native). - Click Save in the lower-right corner.
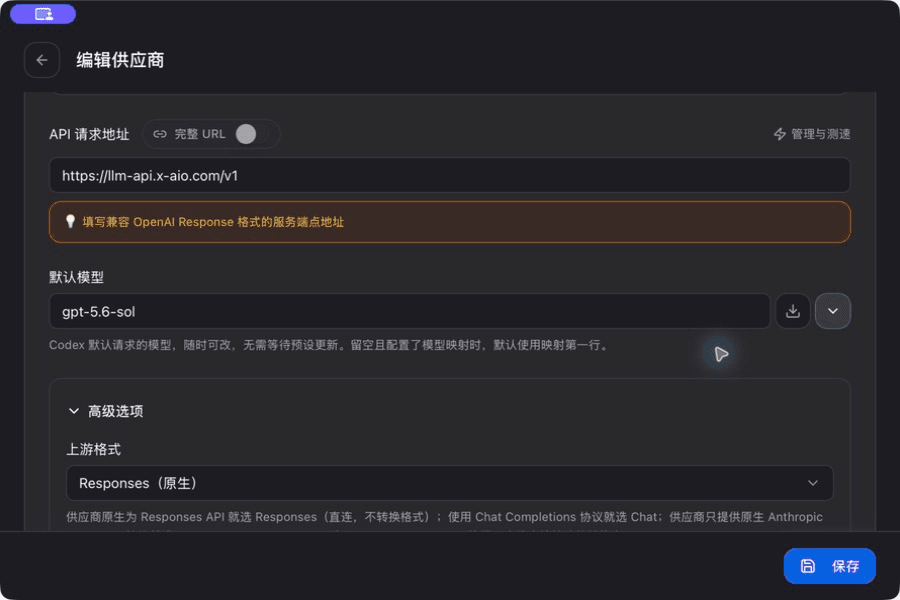
If Codex is already running, enter /exit to quit it, then restart it. Switching providers or models does not modify an existing process.
8. Verify the configuration in an empty folder
Codex can read and modify files in the current directory. For your first test, use a newly created empty temporary folder rather than an important project, the desktop, or a directory containing personal files.
Open Terminal and run these commands in order:
demo_dir="$(mktemp -d /tmp/xaio-codex-demo.XXXXXX)"
cd "$demo_dir"
pwd
ls -A
codex --sandbox read-only
No output from ls -A means the test folder is empty. macOS may display /tmp as /private/tmp; both paths refer to the same temporary directory.
If Codex displays Do you trust the contents of this directory?, confirm that the full path is under /tmp or /private/tmp and that the directory name starts with xaio-codex-demo., then select 1. Yes, continue. Do not trust an unfamiliar directory or one containing important files.
After the conversation starts, send:
Reply only with "Configuration successful." Do not create, modify, or delete any files, and do not run commands.A response of "Configuration successful" confirms that Codex completed a real request through X-AIO. The following output summarizes the actual verification performed for this tutorial; unrelated logs have been omitted:
OpenAI Codex v0.149.1
workdir: /private/tmp/xaio-codex-demo.XXXXXX
model: gpt-5.6-sol
provider: custom
sandbox: read-only

Configuration successful.
Enter /exit or press Ctrl+C to quit Codex, then inspect the test folder again:
ls -AIf the command still has no output, the folder remains empty. This tutorial was fully verified: gpt-5.6-sol returned "Configuration successful," the process exited with code 0, and the test directory was empty before and after the request.
Troubleshooting
The terminal reports brew: command not found
Run the Next steps shown at the end of Homebrew installation again, then quit Terminal completely and reopen it. Do not copy another computer's /opt/homebrew or /usr/local path directly.
The terminal reports node: command not found or npm: command not found
Confirm that brew install node@24 finished, then run:
echo 'export PATH="$(brew --prefix node@24)/bin:$PATH"' >> ~/.zshrc
source ~/.zshrc
node --version
npm --version
The terminal reports codex: command not found
Return to CC Switch Settings -> About -> Local Environment Check, click Install on the Codex card, then click Refresh after installation. If the card already shows a green check mark, quit Terminal completely, reopen it, and run codex --version.
A request returns 404 or "model does not exist"
The default model is usually no longer available or is not included in the current plan. Open Edit on the X-AIO Tokens Plan provider, click Get Model List, select a model that appears in the current list, and save. Then quit and restart Codex. Do not continue using the old model name from the error.
The request address contains /responses. Should I remove it manually?
No. The base URL saved in CC Switch should be https://llm-api.x-aio.com/v1; Codex automatically appends /responses. If a request returns 404, check the base URL and model first. Do not change the endpoint to the root domain or append /responses a second time.
CC Switch does not open after you click one-click setup
Confirm that CC Switch is installed in Applications and has been opened manually at least once. Return to Chrome and click One-click Setup for CC Switch (Codex) again, then click Open CC Switch when the external application prompt appears. You do not need to select Always allow.
Codex still uses the old provider or model after launch
Confirm that the X-AIO Tokens Plan card has a blue border and that the model edit page was saved. Enter /exit to quit the current Codex process completely, then run codex again in the test directory.
A request reports 401, an invalid key, or a long timeout
Confirm on the X-AIO API key page that the CC Switch - Codex key is still within its 90-day validity period, and verify that the Tokens Plan is available. A new key may need a short time to synchronize; wait about one minute and retry. If official OpenAI pages are inaccessible, also consider the regional restrictions and network conditions described above.
Configure Codex with X-AIO Coding Helper
Use an official Codex installation method and the current X-AIO Coding Helper 0.9.x release line to configure a Responses provider, select a model, and verify your first request.
Roo Code (VS Code, Legacy Compatibility Guide)
A beginner-friendly guide to installing Roo Code 3.54.0, configuring an X-AIO OpenAI-compatible provider, and running your first task.