
Configure Claude Code with X-AIO Coding Helper
Install Claude Code with the official installer, then use the current X-AIO Coding Helper 0.9.x release line to configure four models, the gateway, and your first verified request.
This tutorial uses macOS, Claude Code 2.1.245, and the current X-AIO Coding Helper 0.9.x release line to walk through the complete process: installation, API key creation and entry, model selection, and your first request. It is compatible with version 0.7.x or later. The installation command uses @latest to get the newest patch in the current release line. Commands for Linux, WSL, and Windows are included in the relevant steps.
Before you begin
- Anthropic now recommends the native Claude Code installer. The npm installation should no longer be treated as the only option.
- The official Coding Helper command is spelled
xaio-chelper;chelperis part of the product's command name. - The gateway uses the X-AIO Anthropic root endpoint at
https://llm-api.x-aio.com. Coding Helper0.7.xand later no longer write the legacy/anthropicpath. - This tutorial uses only sanitized terminal SVG illustrations. Never put a real API key in a repository, screenshot, support ticket, or chat.
1. Prepare your environment
Both the official Claude Code service and X-AIO are subject to their respective regional availability, account requirements, and terms of service. Review Anthropic's supported countries and regions before you begin. Gateway configuration cannot bypass these policies.
Coding Helper requires Node.js 18 or later. To remain compatible with the fallback npm installation for Claude Code, Node.js 22 or later is recommended. Check your local environment:
node --version
npm --version
If Node.js is not installed, install an LTS release from the official Node.js website. Claude Code itself does not require Node.js when installed with the native macOS installer, but Coding Helper still does.
2. Install Claude Code using an official method
macOS, Linux, or WSL
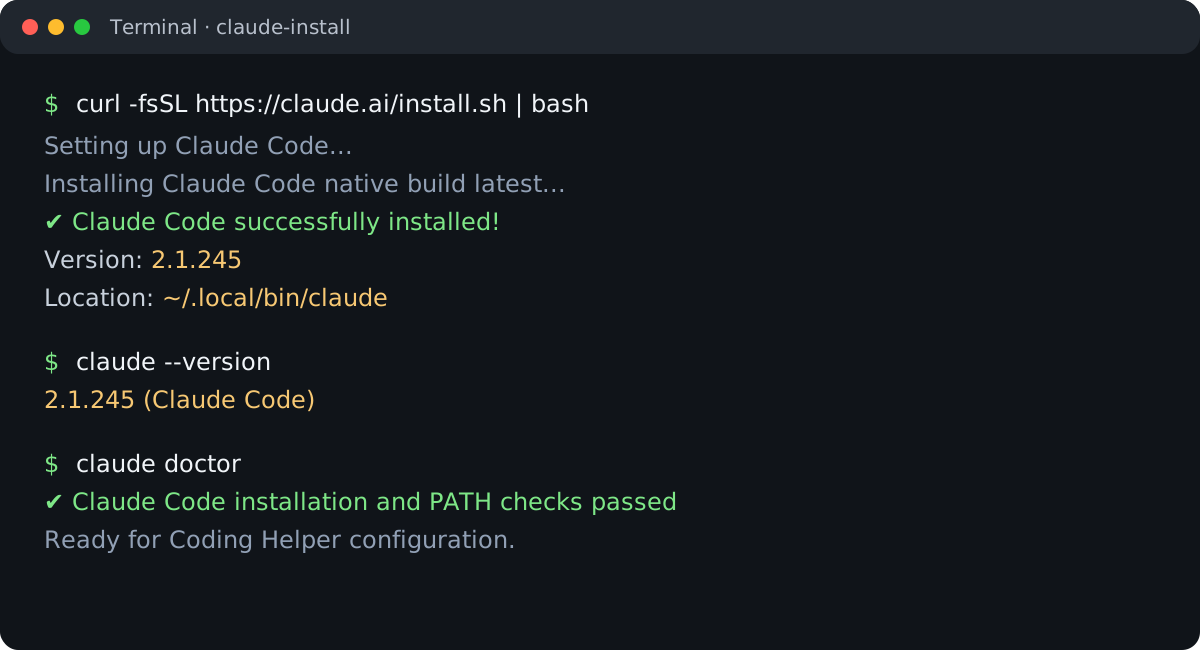
Run Anthropic's currently recommended native installation command in a terminal:
curl -fsSL https://claude.ai/install.sh | bashAfter installation, verify the version and environment:
claude --version
claude doctor
If the terminal reports claude: command not found, first add the directory used by the native installer to the current shell's PATH:
export PATH="$HOME/.local/bin:$PATH"Once the command works, add the same line to ~/.zshrc for zsh or ~/.bashrc for bash, then reopen the terminal.
Windows PowerShell
Open PowerShell as a standard user and run:
irm https://claude.ai/install.ps1 | iexWindows Command Prompt
Run the following command in Command Prompt:
curl -fsSL https://claude.ai/install.cmd -o install.cmd && install.cmd && del install.cmdAlternative installation methods
If you cannot use the native installer, install Claude Code with Homebrew or npm:
# macOS Homebrew
brew install --cask claude-code

# npm fallback (requires Node.js 22+)
npm install -g @anthropic-ai/claude-code
Do not use sudo npm install -g. Regardless of the method, verify the installation afterward:
claude --versionThis tutorial was tested with version 2.1.245. Fable 5, Sonnet 5, and Opus 5 require a recent Claude Code release. Run claude update first if your version is outdated.
3. Create an X-AIO API key
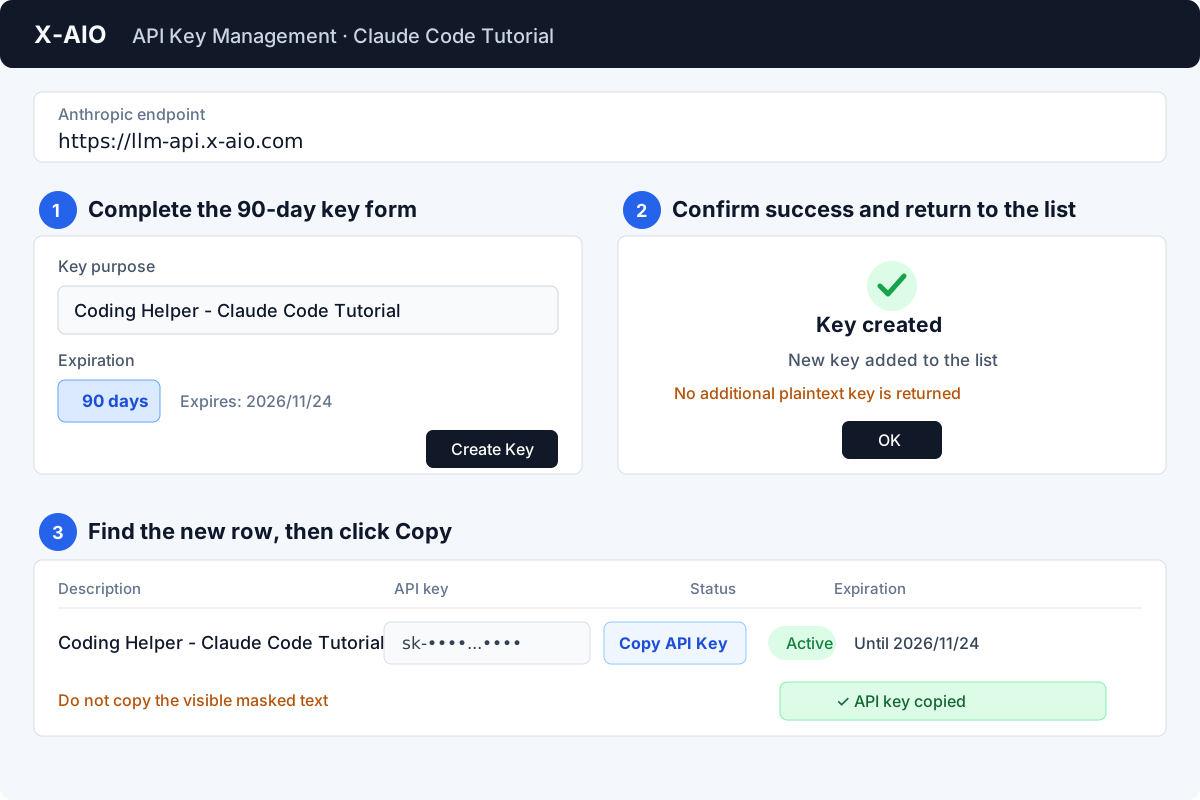
- Open X-AIO API Key Management and sign in to the demo account.
- Click Create New Key.
- Enter an easy-to-recognize name in the key purpose field, such as
Coding Helper - Claude Code Tutorial. - Select an expiration period. 90 days is recommended; do not create a permanent key for a tutorial or temporary test.
- Click Create Key.
- The success message only confirms that the new key was added to the list; it does not display or return another plaintext key. Click OK to return to the key list.
- Find
Coding Helper - Claude Code Tutorialin the list, confirm that its status is Active, and click Copy API Key in that row.
The new key is not limited to a one-time display during creation. From the list, you can use Show API Key to reveal the full value or Copy API Key to place it directly on the clipboard; this tutorial uses the latter. The list displays a masked value such as sk-••••...•••• by default. Do not copy the masked text you can see on the page.
Protect your key
Do not paste the key into Markdown, a terminal recording, a Git repository, or a public chat. The terminal prompt below masks all typed characters. If the key has been exposed, delete it immediately from API Key Management and create a replacement.
4. Install and start Coding Helper
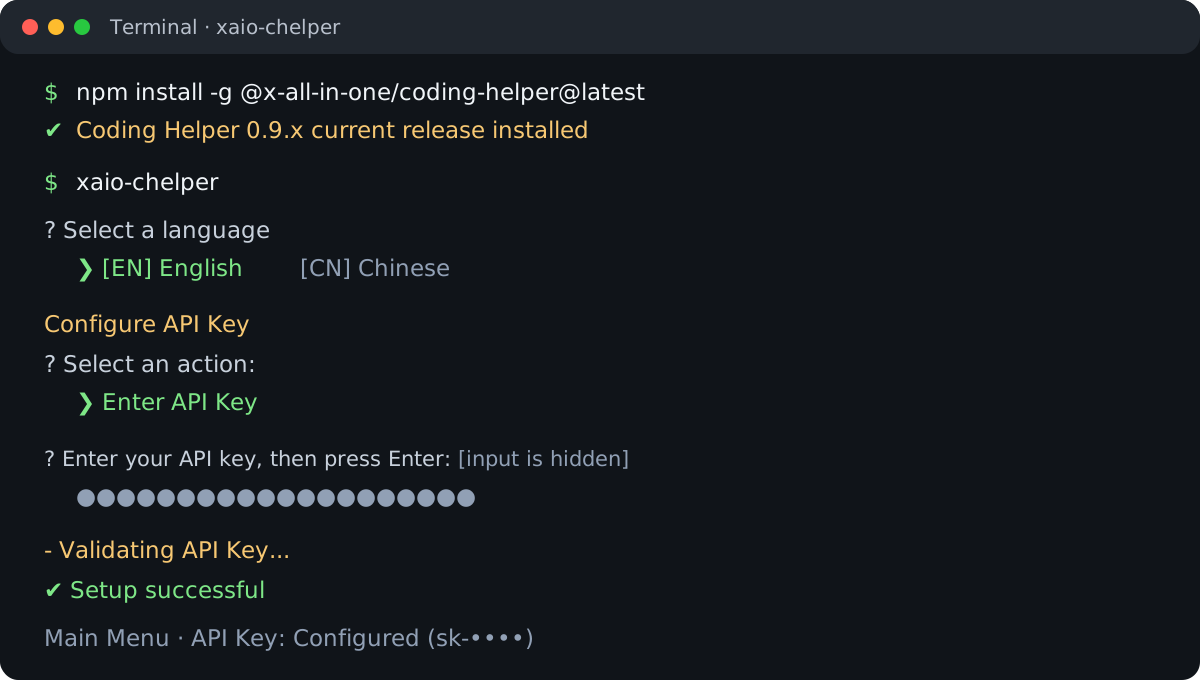
Use @latest to install the current Coding Helper 0.9.x release line. This tutorial requires 0.7.x or later and does not pin a specific patch version:
npm install -g @x-all-in-one/coding-helper@latestAfter installation, start the full interactive wizard:
xaio-chelperOn the first run, complete the initial setup in this order:
- Select [EN] English from the language list.
- The wizard automatically opens the API Key page. Select Enter API Key; you do not need to return to the main menu first.
- Paste the complete value copied from the API key list and press Enter. The prompt displays dots instead of the actual characters.
- Wait for Validating API Key... to finish and display Setup successful. The wizard then opens the main menu.
If Coding Helper has already run on this computer, it opens the main menu directly. Select Configure API Key → Update API Key. The option is labeled Enter API Key only when no key has been saved. After you paste the key and validation succeeds, the wizard returns to the main menu automatically.
The helper validates the key through https://llm-api.x-aio.com/v1/models and does not ask you to sign in to an Anthropic account. Its own configuration is stored in ~/.xaio-chelper/config.yaml.
5. Configure Claude Code and four models
If the main menu from the previous section is still open, continue there. Otherwise, restart the interactive wizard:
xaio-chelperThen follow the complete menu path:
- From the Main Menu, select Configure Coding Tools.
- Select Claude Code from the tool list.
- From the Claude Code Management Menu, select Configure Models - (Select Haiku/Sonnet/Opus/Fable models).
The model selector lets you choose each model from the list returned by the API. The following table shows the recommended defaults for this tutorial. Select the complete model ID rather than guessing from model size or list order:
| Claude Code role | Selected model |
|---|---|
| Haiku | claude-haiku-4-5-20251001 |
| Sonnet | claude-sonnet-5 |
| Opus | claude-opus-5 |
| Fable | claude-fable-5 |
You can also select other open-source models
These models are not mandatory. Based on speed, capability, and cost, you can assign another compatible open-source model from the list to any of the Haiku, Sonnet, Opus, or Fable roles. Select directly from the live model list retrieved by Coding Helper; do not manually enter a model ID that is not listed. If you choose a different model, it is normal for that model to appear in the management menu and in Claude Code's /status output.
The helper's built-in Haiku default is currently the dated ID claude-haiku-4-5-20251001. If several similar entries appear, select this exact ID from the table. After saving all four models, press Enter to accept Yes when prompted with Apply the configuration to Claude Code now? (Y/n).
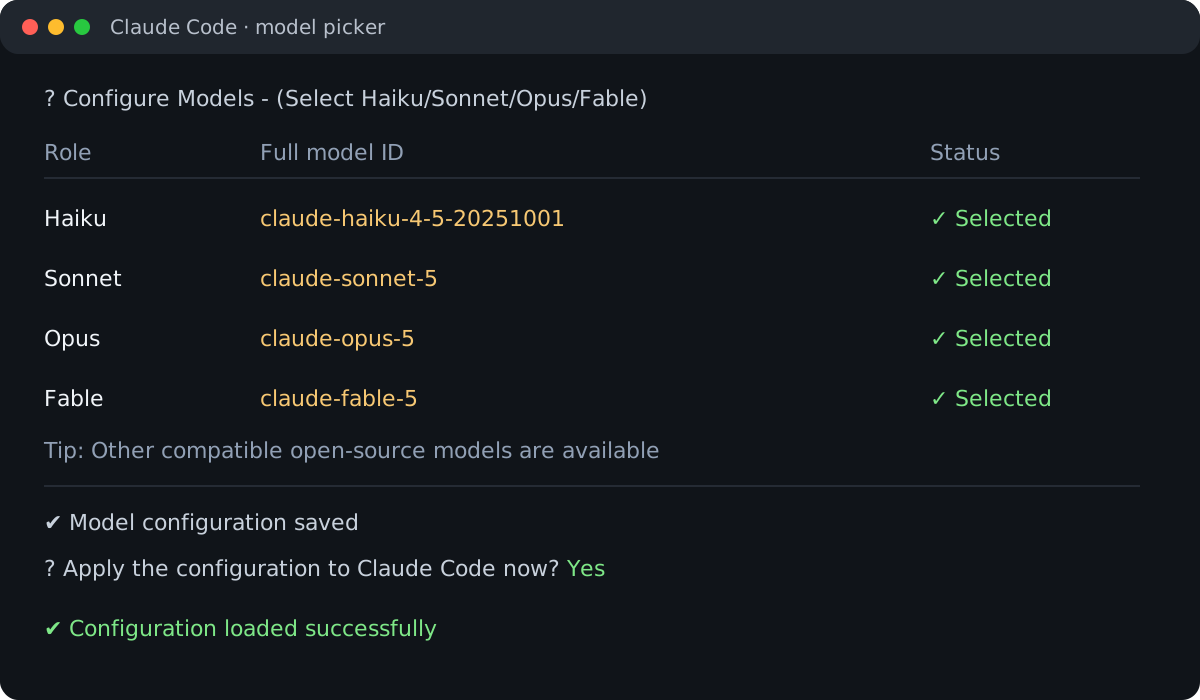
After the configuration loads successfully, the Claude Code management menu should show:
- Endpoint:
https://llm-api.x-aio.com - The same four models you selected
- Status:
Configuration synced
Coding Helper 0.7.x and later write the configuration to the user-level ~/.claude/settings.json and mark onboarding as complete in ~/.claude.json. The helper preserves other existing settings and environment variables. A project-level .claude/settings.json does not replace this global configuration step.
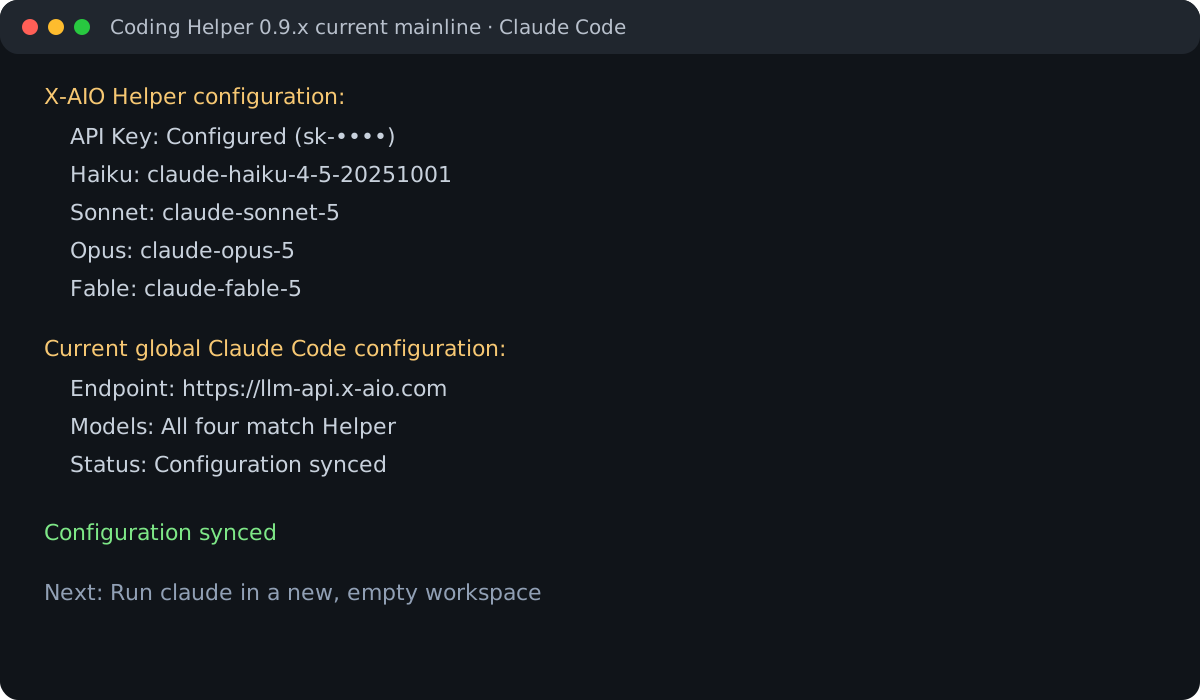
If you did not apply the configuration immediately after saving the models, run the interactive wizard and select Main Menu → Configure Coding Tools → Claude Code → Load Configuration - (Apply your configuration to Claude Code).
If you previously used an early version that still wrote the /anthropic path, refresh the configuration once through the interactive menu to remove that legacy path. Run:
xaio-chelperThen select Main Menu → Configure Coding Tools → Claude Code → Refresh Configuration - (Update Claude Code configuration) and wait for the confirmation that the configuration loaded successfully.
6. Verify a real request in an empty directory
For the first run, use a newly created empty directory so Claude Code cannot accidentally read or modify important files:
demo_dir="$(mktemp -d /tmp/xaio-claude-code-demo.XXXXXX)"
printf '%s\n' "$demo_dir"
cd "$demo_dir"
claude
If a directory trust prompt appears, approve only the empty directory you just created. After Claude Code starts, run:
/statusConfirm that Anthropic base URL is https://llm-api.x-aio.com, the authentication source is ANTHROPIC_AUTH_TOKEN, and the installed version is recent enough. With the recommended defaults in this tutorial, the default model should be claude-opus-5. If you selected another open-source model in the previous step, its model ID appears here instead.
Then send a test request that does not modify files:
Reply only with "Configuration successful." Do not create, modify, or delete any files.After receiving the response, enter /exit, then inspect the directory:
if [ -n "$(ls -A .)" ]; then
  ls -la .
else
  printf '%s\n' '(empty)'
fi
If the output is (empty), the verification did not create any files. If files are listed, stop and review the request and Claude Code's permissions. You can also select Launch Claude Code from the helper's Claude Code management menu, but running claude in a new terminal makes the current directory and PATH easier to confirm.
Once you have confirmed that the directory is still empty, return to /tmp and remove the test directory:
cd /tmp
rmdir "$demo_dir"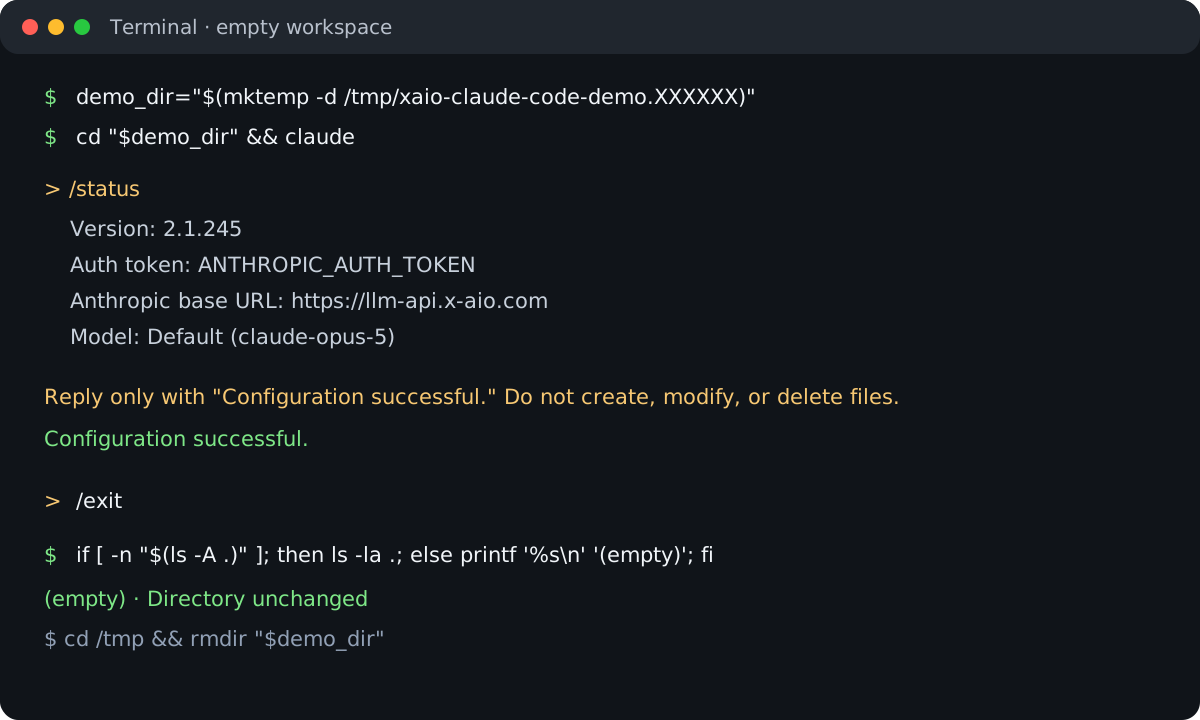
7. Troubleshooting
The Anthropic sign-in page still opens
Exit the current Claude Code session, then start Coding Helper:
xaio-chelperSelect Main Menu → Configure Coding Tools → Claude Code → Refresh Configuration - (Update Claude Code configuration). After the refresh completes, exit Coding Helper, restart Claude Code, and run /status. The expected status shows the X-AIO root endpoint and ANTHROPIC_AUTH_TOKEN. Do not use the Anthropic web sign-in to work around an incorrect gateway configuration.
A 403 error or "inaccessible path" is reported
Check that ANTHROPIC_BASE_URL in ~/.claude/settings.json is:
https://llm-api.x-aio.comIf it still contains the legacy https://llm-api.x-aio.com/anthropic value, upgrade to Coding Helper 0.7.x or later:
npm install -g @x-all-in-one/coding-helper@latestAfter the upgrade, run:
xaio-chelperSelect Main Menu → Configure Coding Tools → Claude Code → Refresh Configuration - (Update Claude Code configuration), then exit Claude Code completely and restart it.
API Key is invalid or expired
- Confirm that you copied the complete value from the API key list rather than the masked
sk-xxxx...text. - After creating a key, wait briefly, run
xaio-chelper, and select Main Menu → Configure API Key → Update API Key. Paste the complete key again and wait for validation to succeed. - Check that the key has not expired and belongs to the correct workspace. If necessary, revoke the old key and create a new 90-day key.
A model is missing from the model list
Confirm that the API key belongs to the correct workspace. Run xaio-chelper, then select Main Menu → Configure Coding Tools → Claude Code → Configure Models - (Select Haiku/Sonnet/Opus/Fable models) to have the helper retrieve the latest list. For Haiku, select the dated claude-haiku-4-5-20251001 ID. Do not manually substitute an alias that is not in the list.
How can I confirm that the configuration worked?
Run xaio-chelper, then select Main Menu → Configure Coding Tools → Claude Code. The management menu should show the X-AIO root endpoint, the four selected models, and Configuration synced. Finally, follow Section 6 to open Claude Code and verify both /status and a real request.