
Configure WorkBuddy with X-AIO Coding Helper
Use the interactive menus in the current Coding Helper 0.9.x mainline to load every available X-AIO model into WorkBuddy and complete your first chat.
WorkBuddy is an AI workspace for individuals and teams that lets you switch between models in a single interface. This guide covers Coding Helper configuration: the current Coding Helper 0.9.x mainline includes a WorkBuddy adapter that can load every model available to the current API key into WorkBuddy at once, without entering the endpoint URL, API key, and model ID for each model individually.
If you do not want to install Coding Helper or need only one model, see Manually Configure X-AIO in WorkBuddy.
Understand the configuration scope
- This guide runs
xaio-chelperwithout arguments. All Helper operations take place in the interactive menus. - The Helper manages only WorkBuddy's X-AIO model list. It does not install, update, sign in to, or launch WorkBuddy.
- Quit WorkBuddy completely before loading models so the application and Helper do not write to the model configuration at the same time. Reopen WorkBuddy only after loading finishes.
- The Helper writes the API key to WorkBuddy's local model configuration. Do not commit, synchronize, or publish this file.
This guide does not perform a real WorkBuddy sign-in, model load, or request on the demonstration computer. The terminal and setup illustrations for the Helper workflow are sanitized SVGs. The final WorkBuddy screenshots are reused unchanged from the manual guide and keep all key values masked. Follow the steps on your own device.
Before you begin
You will need:
- A computer that can run WorkBuddy and Node.js;
- An account you can use to sign in to WorkBuddy;
- An X-AIO account with available allowance and permission to create an API key;
- Node.js 18 or later and npm.
Official resources:
1. Install and sign in to WorkBuddy
- Open the WorkBuddy website and download the installer for your operating system.
- Launch WorkBuddy after installation. A sign-in page appears the first time you open the app.
- Scan the QR code with your phone and confirm the sign-in on the phone. You are signed in when the left navigation and chat area appear.
- If the QR code expires, refresh it and scan the new code. You do not need to enter a WeChat password or any other account password in the model configuration.
- After confirming that you are signed in, quit WorkBuddy completely. On macOS, select Quit WorkBuddy rather than simply closing the window.
2. Create an API key and copy it from the list
- Open X-AIO API Key Management in a browser and sign in to your account.
- Confirm that the OpenAI-compatible endpoint displayed on the page is
https://llm-api.x-aio.com/v1. - Click Create API Key and enter a recognizable purpose, such as
WorkBuddy - Coding Helper tutorial. - Select a limited expiration period, such as 90 days. Do not create a permanent key for a tutorial.
- Click Create Key, wait for the success message, and click OK to return to the key list.
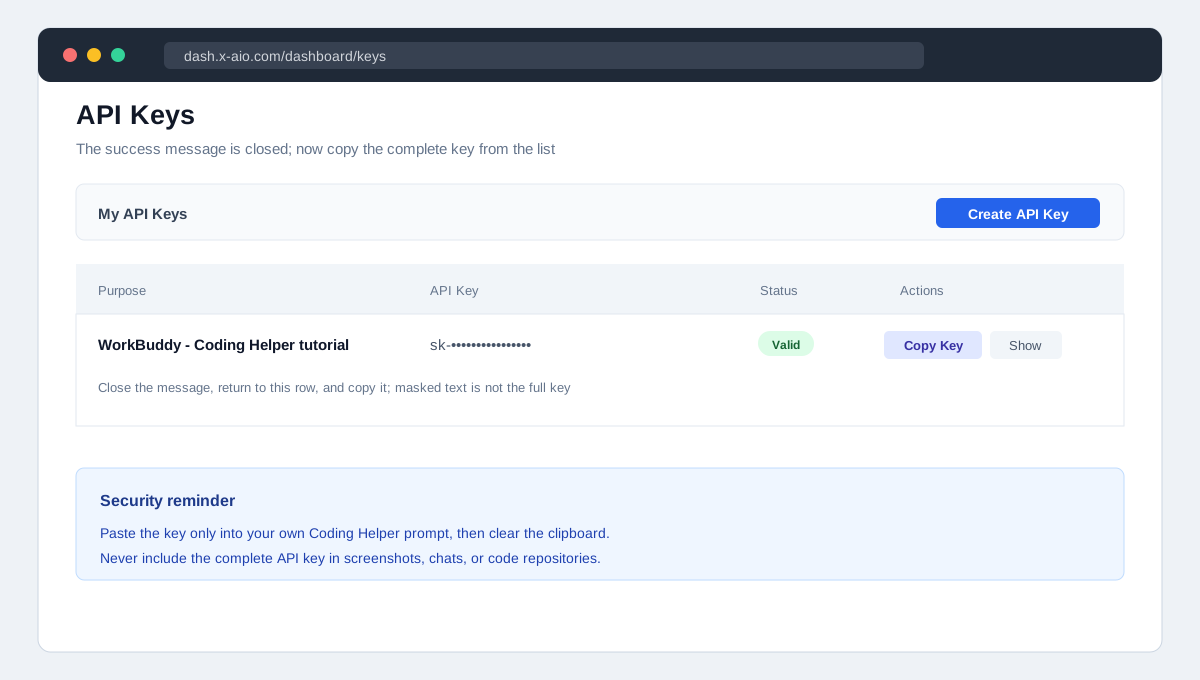
- Find the purpose you just entered, confirm that its status is Valid, and click Copy API Key on that row.
- To inspect the key manually, click Show API Key, verify it, and hide it immediately. The masked text in the list is not the complete key and cannot be used in its place.
A new key is not available only at the moment of creation. The correct sequence is Create → click OK → return to the list → find the row → copy the API key.
3. Install and start Coding Helper
Check Node.js and npm in a terminal first:
node --version
npm --version
If Node.js is not installed, install the current LTS release from the Node.js website.
Install the current Coding Helper 0.9.x mainline with @latest so you receive subsequent patches. Do not pin an exact patch version:
npm install -g @x-all-in-one/coding-helper@latestAfter installation, run only the official command without arguments to open the complete interactive wizard:
xaio-chelper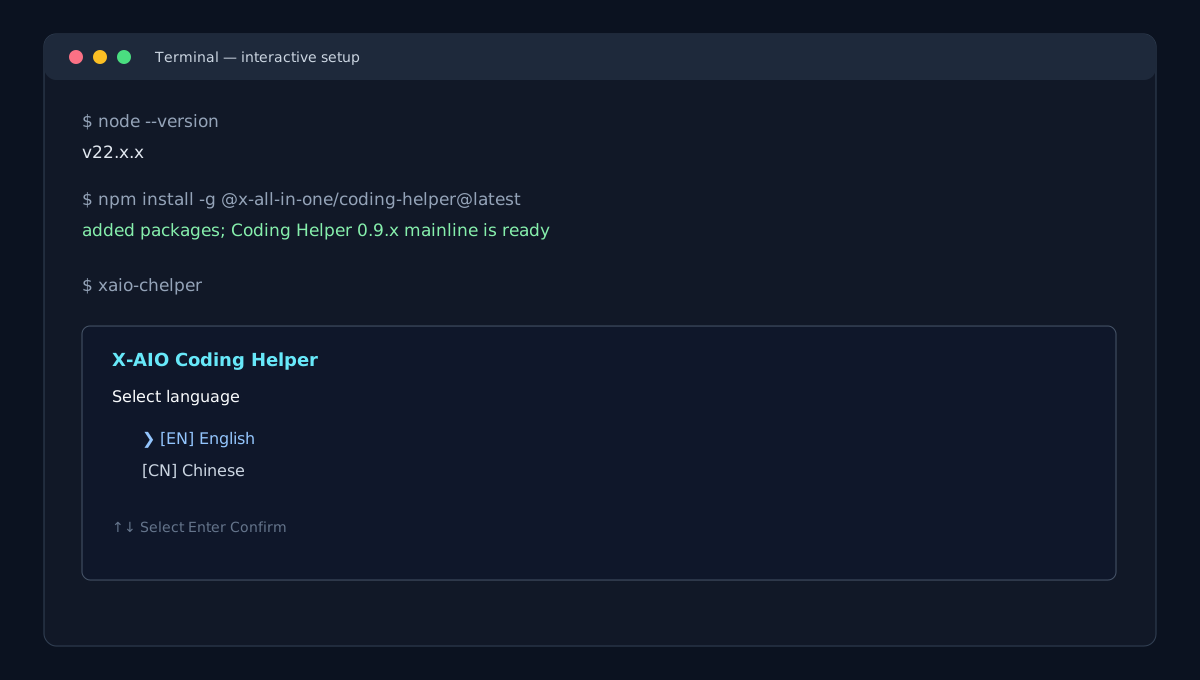
4. Enter and validate the API key in the interactive menu
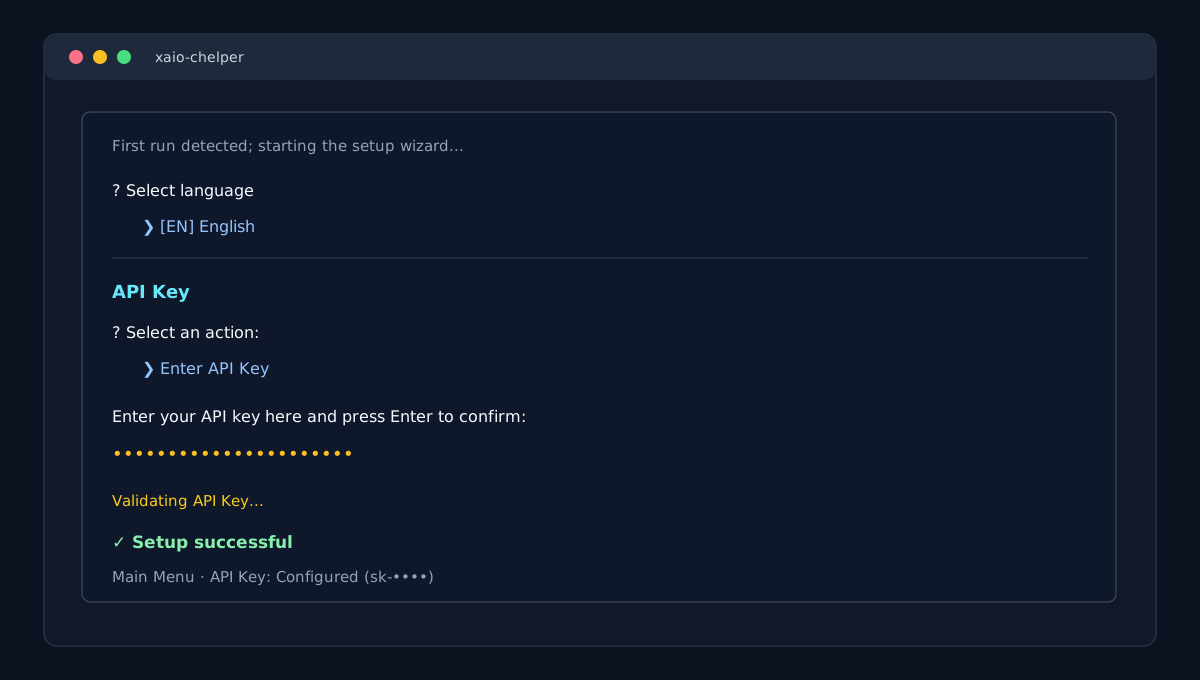
On the first run, proceed in this order:
- Select [EN] English on the language screen and press Enter.
- The wizard automatically opens the API Key page. Select Enter API Key; you do not need to return to the main menu first.
- Paste the complete value copied from the target key row in Section 2, then press Enter. The input appears as dots.
- Wait for Validating API Key... to finish and confirm that Setup successful or API Key validation successful appears.
- Return to the main menu and confirm that the API Key status is Configured.
If you have run the Helper before, it opens the main menu directly. Select Configure API Key → Update API Key. The option is labeled Enter API Key only when no key has been saved.
5. Load every available model into WorkBuddy
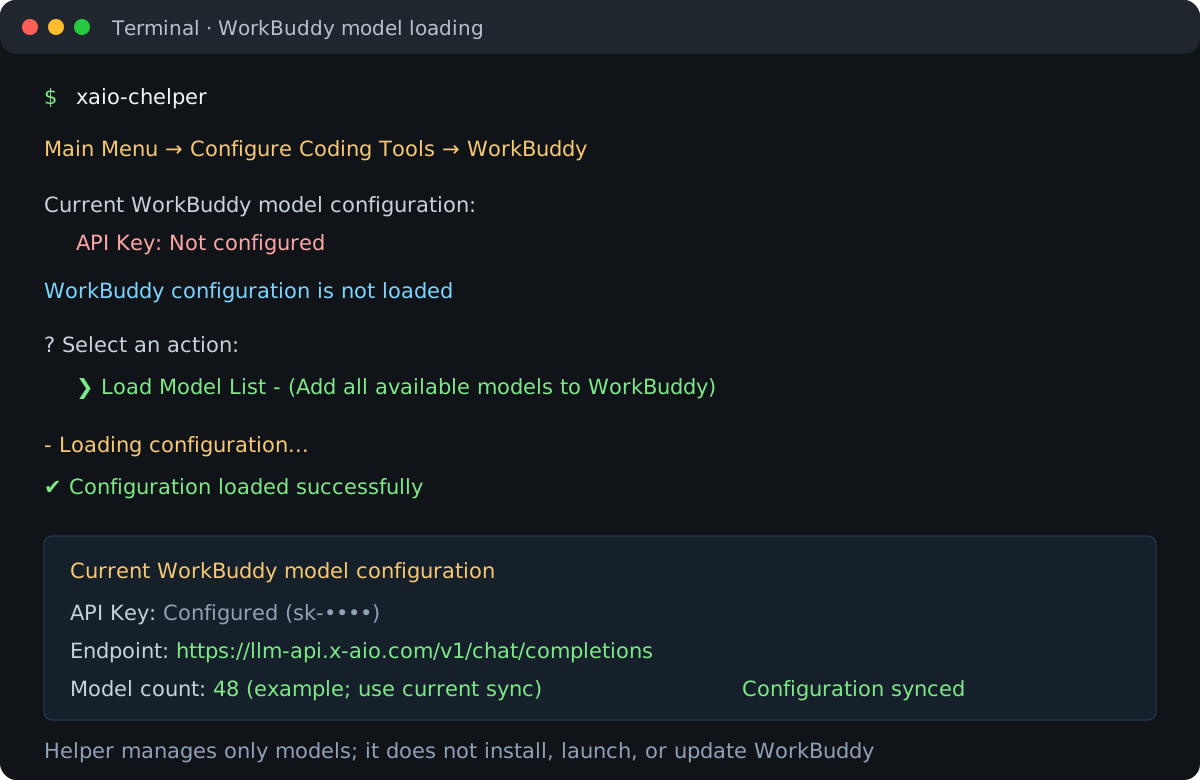
Confirm that WorkBuddy is completely closed, then use this menu path in the Helper:
- From the Main Menu, select Configure Coding Tools.
- Select WorkBuddy from the tool list.
- For the first configuration, select Load Model List - (Add all available models to WorkBuddy) from the WorkBuddy Management Menu.
- Wait while the Helper retrieves the live model list for the current API key and writes the configuration. Confirm that Configuration loaded successfully appears.
- Back in the WorkBuddy management menu, verify that the full endpoint is
https://llm-api.x-aio.com/v1/chat/completions, the model count is greater than zero, and the status is Configuration synced.
If the management menu already displays a model count, this computer has X-AIO models managed by the Helper. Select Refresh Model List - (Update available models in configuration) to retrieve the current list and replace the X-AIO model entries.
What loading writes
For each model, the Helper saves the complete chat endpoint, API key, model ID, and capability flags. Model display names include the (X-AIO Tokens Plan) suffix. Refreshing preserves models from other providers but replaces every old entry that uses the same X-AIO chat endpoint.
Default configuration locations:
| System | WorkBuddy model configuration |
|---|---|
| macOS / Linux | ~/.workbuddy/models.json |
| Windows | %USERPROFILE%\.workbuddy\models.json |
If WORKBUDDY_CONFIG_DIR is set, the Helper uses that directory. The legacy CODEBUDDY_CONFIG_DIR is also supported. The Helper preserves other top-level fields and non-X-AIO models, writes the file with an atomic replacement, and limits its permissions to the current user. If the original file is not valid JSON, the Helper stops and reports an error instead of replacing it with an empty configuration.
6. Select a model in WorkBuddy and start chatting
Reopen WorkBuddy after loading finishes. The workflow is the same as for a manually configured model:
- If WorkBuddy does not open a blank chat automatically, click the + in the upper-left corner to create one.
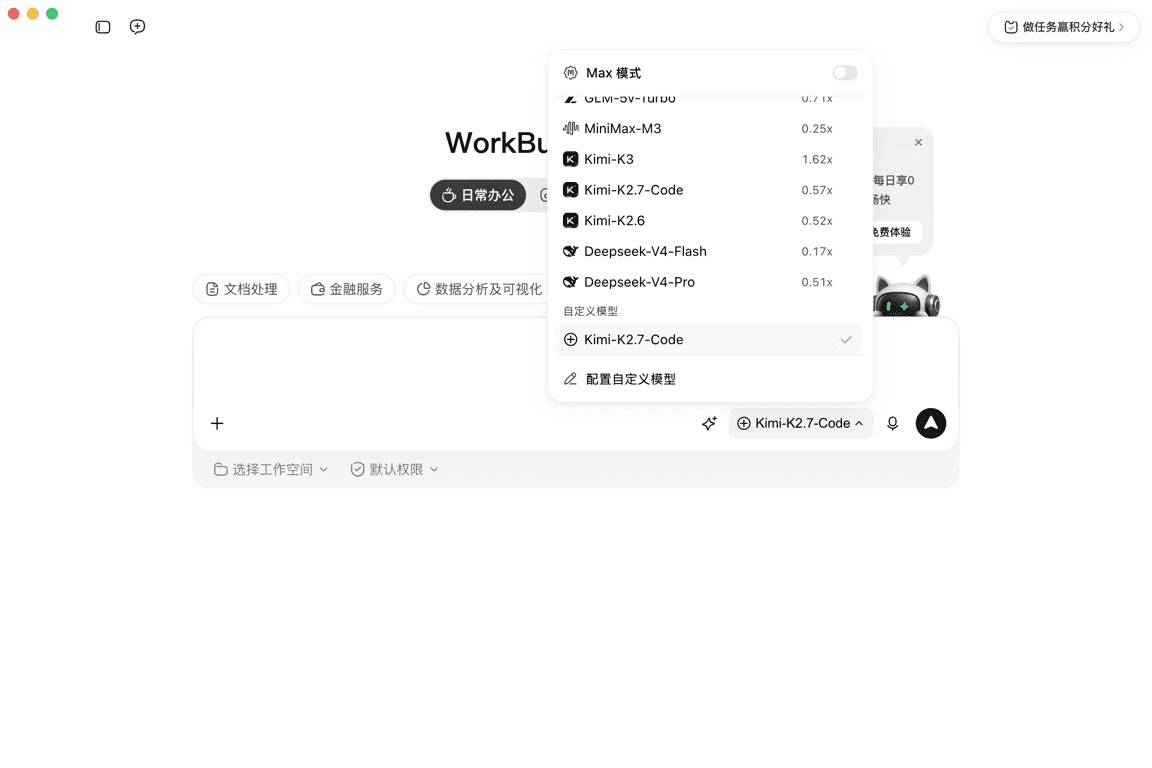
- Click the current model name in the lower-right corner of the input box. Some versions display
Autoby default. - In the Custom group of the model picker, search for
X-AIO Tokens Planor the model ID you want. - Select a model. The example below uses
Kimi-K2.7-Code(X-AIO Tokens Plan). The live list for your account is authoritative. - Send a simple test message:
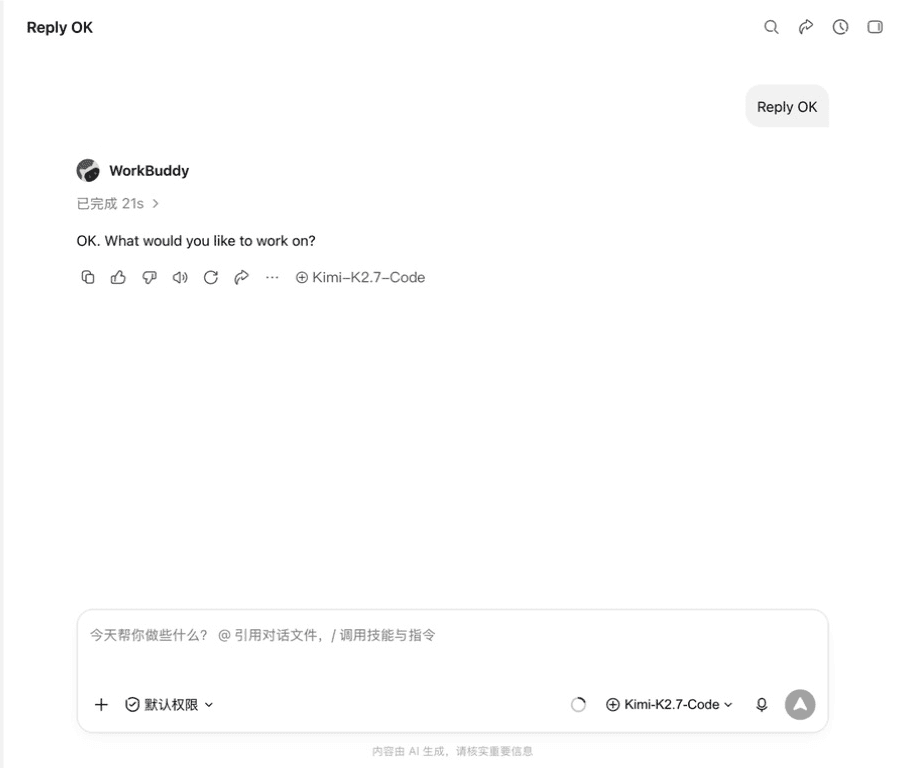
Reply OK- Wait for the model to respond. A normal response in the chat area with the selected custom model name confirms that WorkBuddy can reach the model using the API key and endpoint URL.
The two images below are reused from the standard manual configuration guide and show the model picker and a successful first chat. The manually configured model in the images is named Kimi-K2.7-Code. A model loaded through the Helper includes the (X-AIO Tokens Plan) suffix, but the selection and chat workflow are identical.
You can select another open-source model
The Helper loads every model available to the current API key and does not choose a default for you. You can select another compatible open-source model based on speed, capability, and price. Model availability and names are determined by the X-AIO Model Center and the latest synchronization result.
7. Refresh models, replace the key, or unload models
Refresh available models
Quit WorkBuddy completely, run xaio-chelper without arguments, and select Configure Coding Tools → WorkBuddy → Refresh Model List - (Update available models in configuration). Reopen WorkBuddy after the Helper reports the synchronized model count.
Replace the API key
Run xaio-chelper without arguments. First select Configure API Key → Update API Key to paste and validate the key securely. Then select Configure Coding Tools → WorkBuddy → Refresh Model List. If you update only the Helper key without refreshing WorkBuddy, the old model entries retain the old key.
Unload Helper-managed models
Quit WorkBuddy completely, run xaio-chelper without arguments, and select Configure Coding Tools → WorkBuddy → Unload Model List - (Remove X-AIO models from WorkBuddy). Confirm the operation, then reopen WorkBuddy.
Unloading identifies entries by the complete endpoint URL. It also removes models that you added manually if they use https://llm-api.x-aio.com/v1/chat/completions. Models from other providers and endpoints are preserved.
8. Troubleshooting
WorkBuddy does not appear in the Helper's tool list
This usually means that Coding Helper is out of date. Install @latest again, then run only xaio-chelper. The current 0.9.x mainline should display WorkBuddy under Configure Coding Tools.
X-AIO models are missing from WorkBuddy after a successful load
Confirm that you quit WorkBuddy completely before loading and that the Helper's management menu displays a model count greater than zero. Reopen WorkBuddy after quitting it completely, then search for X-AIO Tokens Plan in the Custom group of the model picker. Closing only the settings window is not sufficient.
The Helper reports invalid JSON in the WorkBuddy configuration
The Helper will not overwrite a configuration it cannot parse. Quit WorkBuddy completely, back up models.json, then repair it according to the WorkBuddy documentation or let WorkBuddy regenerate a valid configuration. Do not replace the damaged file with an example from an unknown source.
401, Unauthorized, or invalid API key
Return to the X-AIO key list and click Copy API Key on the target row. Run xaio-chelper without arguments, then complete Configure API Key → Update API Key followed by Configure Coding Tools → WorkBuddy → Refresh Model List.
402 or insufficient allowance
Open the Tokens Plan Subscription Overview and check your subscription and available allowance. After allowance becomes available, you usually do not need to load the models again; retry the request in WorkBuddy.
Duplicate or outdated X-AIO models appear
Quit WorkBuddy completely and select Refresh Model List in the Helper's WorkBuddy management menu. Refreshing replaces old entries that use the complete X-AIO chat endpoint while preserving models from other endpoints.
9. Clean up after testing
- Quit WorkBuddy completely and select Configure Coding Tools → WorkBuddy → Unload Model List in the Helper.
- Reopen WorkBuddy and confirm that models with the
X-AIO Tokens Plansuffix no longer appear. - Delete the short-lived tutorial key from X-AIO API Key Management.
- Clear your clipboard history and temporary password manager entries.
Deleting the API key only prevents the old models from making requests; it does not remove the local WorkBuddy entries automatically. Unload the models before deleting the key.
Official references
Configure OpenClaw with X-AIO Coding Helper
Use the official OpenClaw setup wizard and the current X-AIO Coding Helper 0.9.x mainline to configure an X-AIO primary model, then start chatting through your own messaging channel.
Manually Configure X-AIO in WorkBuddy
A step-by-step guide to adding a custom X-AIO model in WorkBuddy without Coding Helper.