
Configure OpenClaw with X-AIO Coding Helper
Use the official OpenClaw setup wizard and the current X-AIO Coding Helper 0.9.x mainline to configure an X-AIO primary model, then start chatting through your own messaging channel.
OpenClaw is a personal AI assistant that runs on your own device and connects to messaging channels such as Telegram, Discord, Slack, WhatsApp, Signal, Microsoft Teams, and WebChat. This guide separates installing OpenClaw from configuring X-AIO models: the official OpenClaw wizard configures your channel, while the interactive X-AIO Coding Helper menus configure the model and API key.
This guide is based on OpenClaw 2026.8.1 and the current Coding Helper 0.9.x mainline. If an older version is installed, use the @latest installation command below to upgrade. This guide intentionally does not pin an exact patch version. Wizard wording may vary slightly between releases, but the menu paths and configuration principles remain the same. You must complete channel sign-in and pairing on your own device. This guide shows only the general workflow and contains no real account information, QR codes, or tokens.
Important details
- The official Coding Helper command is
xaio-chelper. This guide always runs it without arguments to open the complete interactive wizard; do not add arguments or subcommands. - For OpenClaw, the current Helper
0.9.xmainline writes only the model configuration. It does not launch OpenClaw or create or modify a channel. After configuration, send/newin your own channel to begin a new conversation. - OpenClaw's X-AIO provider uses the OpenAI-compatible endpoint
https://llm-api.x-aio.com/v1. The Helper excludes embedding models from the live model list. Select a conversational language model as the primary model. - The terminal and web images below are sanitized SVG illustrations. Never include a real API key, channel token, QR code, or account information in screenshots, documentation, support tickets, or code repositories.
Before you begin
Prepare the following:
- A computer that can run Node.js and OpenClaw;
- An account for the messaging channel you intend to connect, including the required sign-in permission or bot token;
- An X-AIO account with available allowance and permission to create API keys;
- A stable network connection. A proxy can improve connectivity, but it cannot change any service's regional policies or account terms.
Official resources:
- OpenClaw installation documentation
- OpenClaw channel documentation
- OpenClaw model provider documentation
- X-AIO API Key Management
- X-AIO Model Center
Security boundary
An OpenClaw agent may read files, execute commands, and send messages through connected channels. The first time you use it, keep the local loopback binding, connect only channels you trust, and grant the minimum necessary skills, hooks, and tools. Do not give an unverified agent direct access to production directories.
1. Prepare Node.js and npm
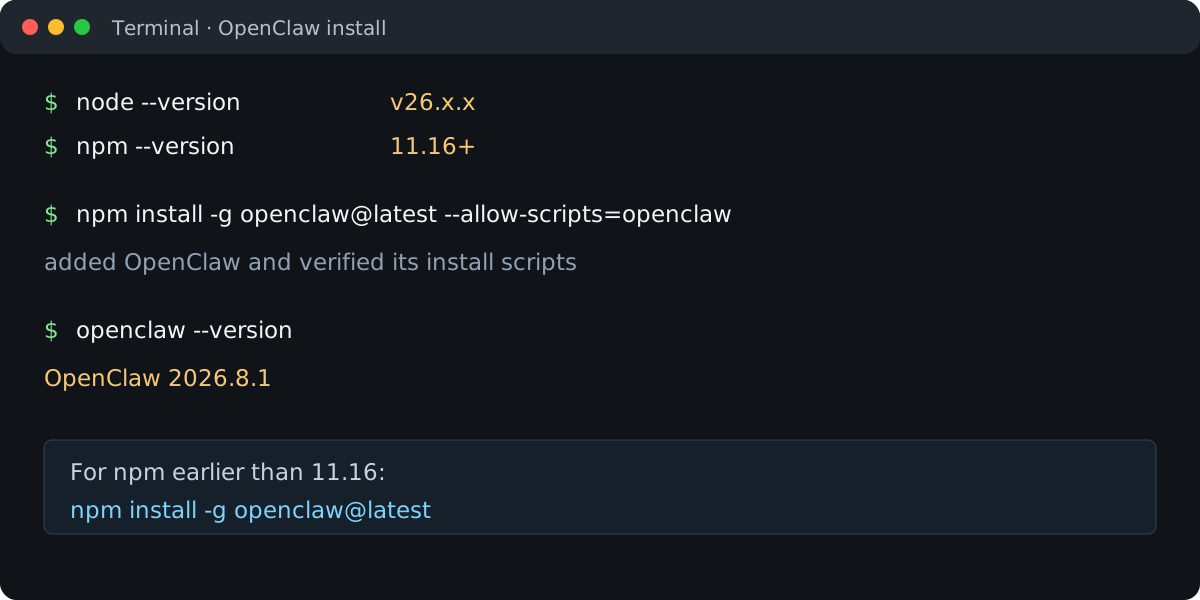
OpenClaw 2026.8.1 compatibility validation requires Node.js 22.22.3+, 24.15+, or 25.9+; Node.js 26 is recommended. Coding Helper itself requires Node.js 18 or later. Check the installed versions first:
node --version
npm --version
If the version does not meet these requirements, install the current LTS release or the version required by OpenClaw from the Node.js website. Do not use sudo npm to install global packages in an unknown system directory. If npm reports permission errors, follow the official npm or Node.js documentation to configure a user-level environment.
2. Install OpenClaw using the official method
Use npm to install the current OpenClaw release. Check the npm version from the previous section and choose the corresponding command:
| npm version | Installation command |
|---|---|
11.16 or later | npm install -g openclaw@latest --allow-scripts=openclaw |
Earlier than 11.16 | npm install -g openclaw@latest |
--allow-scripts=openclaw explicitly authorizes the package installation scripts in newer npm versions. Do not add it when using an older npm version. If you use Homebrew, Docker, or another package manager, follow the relevant section of the official OpenClaw installation documentation. Do not combine multiple global installation methods.
After installation, verify only the version:
openclaw --versionIf the output includes OpenClaw and a version number, the command is available. Installation does not select a channel or model for you. The official interactive wizard in the next section completes the initial setup.
3. Run the official wizard and configure a channel
Start the official OpenClaw interactive wizard in a terminal:
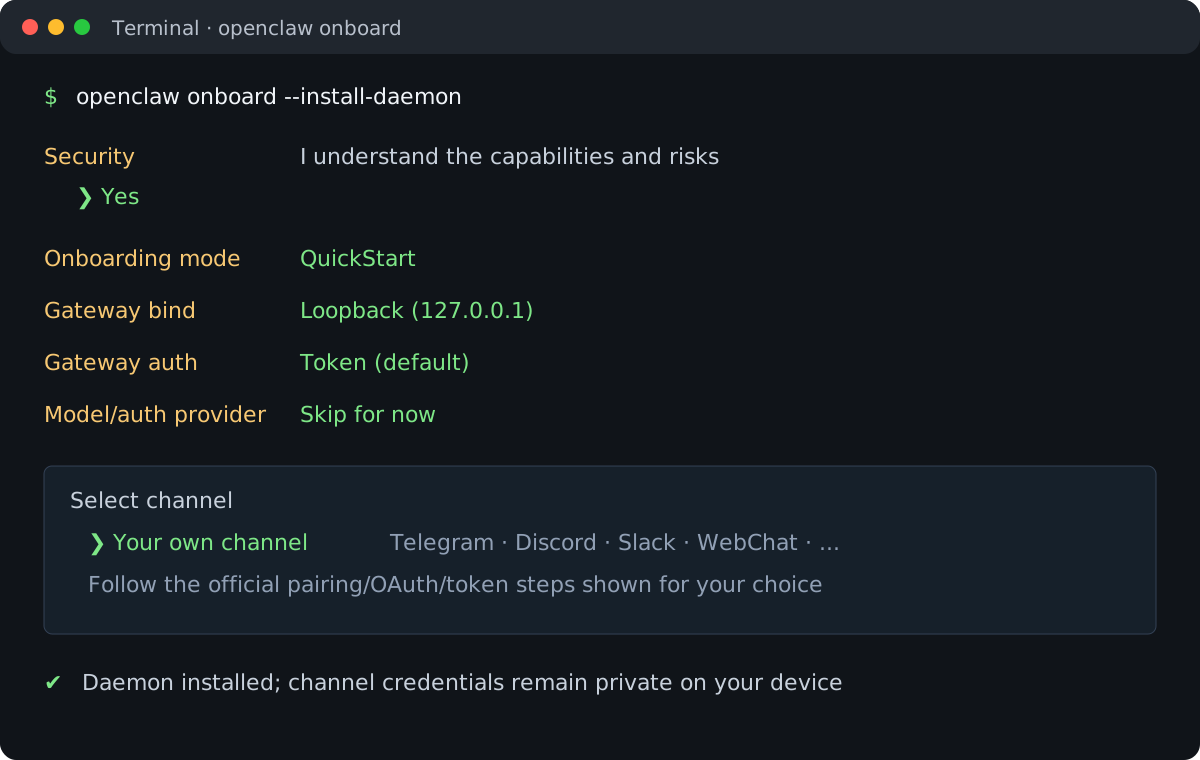
openclaw onboard --install-daemonRead and confirm each wizard step. The order may vary slightly between versions; follow these principles:
- Security confirmation: Read the risk notice. Select Yes only after you understand what the agent can access.
- Onboarding mode: Select QuickStart, or the quick-start option offered by the current version.
- Gateway: Keep the default port, select Loopback (127.0.0.1) as the binding, and retain the official default token or secure authentication option.
- Model/auth provider: Select Skip for now. Coding Helper will write the X-AIO provider later; do not create a duplicate temporary provider here.
- Select channel: Choose the channel you will actually use, such as Telegram, Discord, Slack, or WebChat. Follow the official steps displayed by the wizard to complete OAuth, QR code, or bot token configuration. Paste the channel token only into the wizard on your own device; never copy it into this guide.
- Skills, hooks, and optional integrations: Enable only items you explicitly need and trust. If you are unsure, skip them and add them later by following the official documentation.
- Install the daemon: Review the summary and finish the installation. The daemon lets OpenClaw wait in the background for messages from your configured channel.
If OpenClaw onboarding has already been completed, the wizard may display the existing configuration immediately. Do not delete the configuration just to start over. Add or repair the channel by following the official channel documentation. Coding Helper does not read or enter your channel credentials.
Configure the channel before the model
This section establishes the OpenClaw runtime and messaging entry point only. Skipping the model provider in the wizard is intentional. The next step retrieves an API key from the X-AIO key list, and the Helper then writes the primary model to OpenClaw. Do not maintain two separate X-AIO keys in the OpenClaw wizard and the Helper.
4. Create an X-AIO API key and copy it from the list
4.1 Create the key
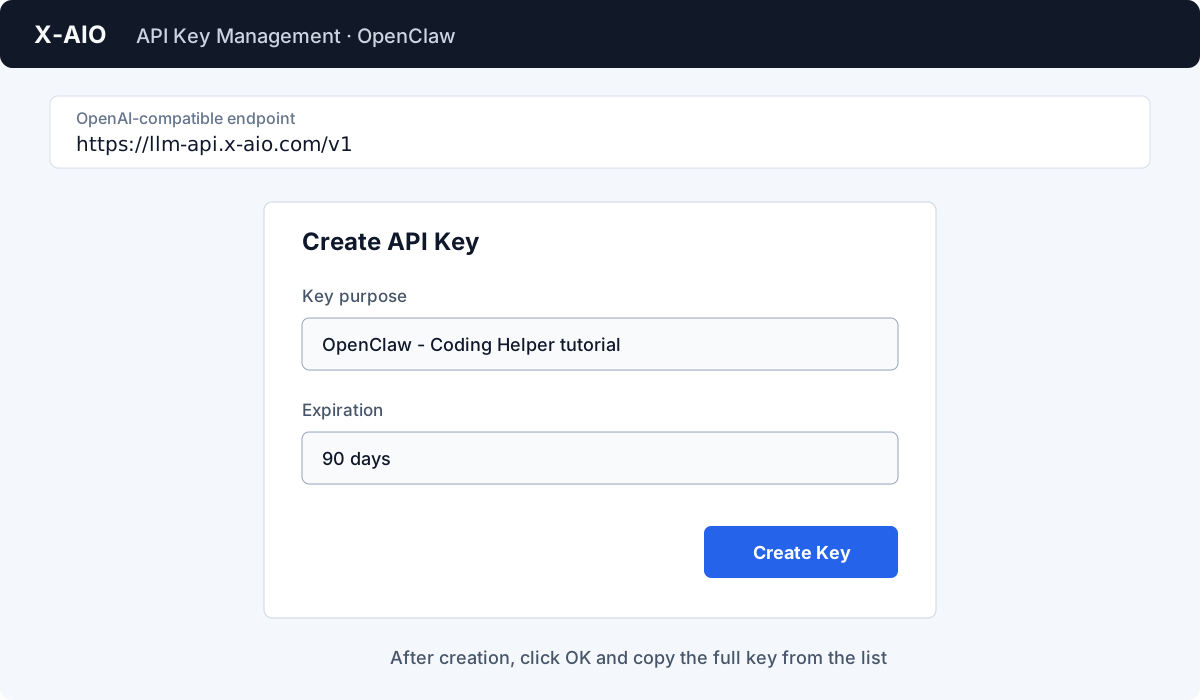
Open X-AIO API Key Management in a browser, sign in to your account, and follow these steps:
- Confirm that the OpenAI-compatible endpoint is
https://llm-api.x-aio.com/v1. - Click Create API Key.
- Enter a recognizable purpose, such as
OpenClaw - Coding Helper tutorial. - Select a limited expiration period. This guide uses 90 days as an example. Do not create a permanent key for temporary testing.
- Click Create Key, then click OK after the success message to return to the key list.
4.2 Copy the complete value from the key list
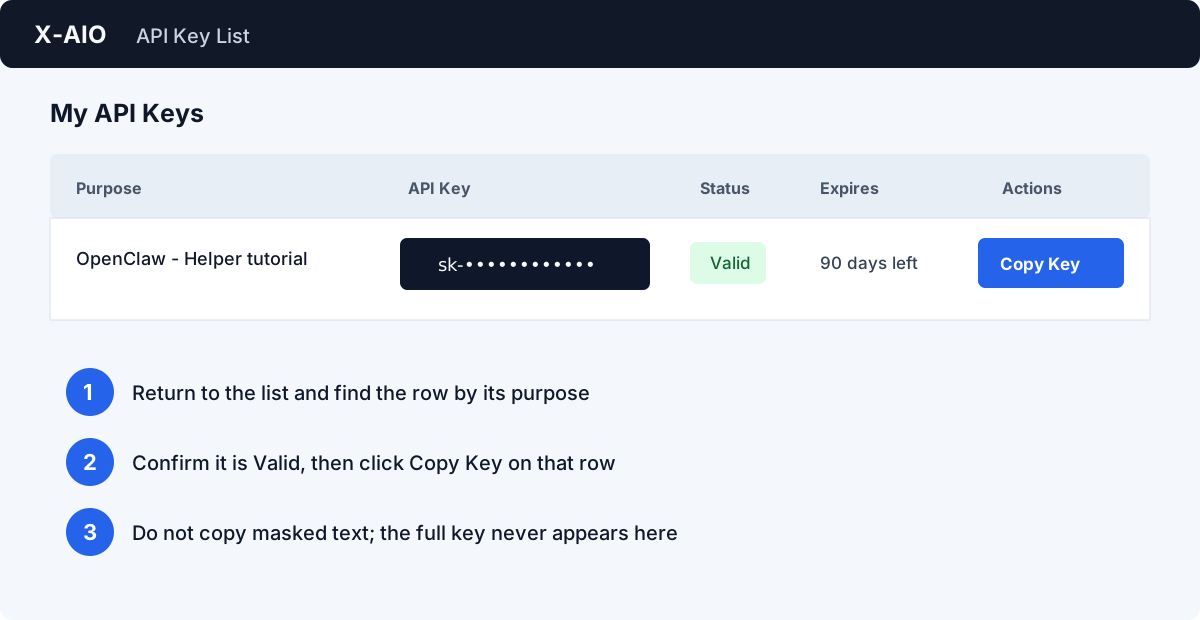
After creating the key, do not remain on the success message. Return to the key list, find the purpose you just entered, confirm that its status is Valid, and click Copy API Key on that row. To inspect it manually, click Show API Key, verify it, and hide it immediately. The sk-••••...•••• string in the list is masked text and cannot be pasted as the key.
A new key is not available only at the moment of creation. Whenever you need to enter it again, return to the same row and use Show API Key or Copy API Key instead of searching browser history, screenshots, or old text.
Keep the key secure
Paste the key only into the Helper's password field in the next section. The field masks its characters. Never include the complete value in Markdown, screenshots, terminal recordings, clipboard synchronization services, public chats, or Git repositories. If the key is exposed, delete it from the list immediately and create a replacement.
5. Install and start the Coding Helper interactive wizard
Install the current Coding Helper 0.9.x mainline with @latest so you receive subsequent patches. Do not pin an exact patch version:
npm install -g @x-all-in-one/coding-helper@latestAfter installation, run only this command without arguments:
xaio-chelperOn the first run, proceed in this order:
- Select [EN] English from the language list and press Enter.
- The wizard automatically opens the API Key page. Select Enter API Key; you do not need to return to the main menu first.
- Paste the complete value copied from the key list in the previous section into the password field and press Enter. Dots on the screen are expected.
- Wait for Validating API Key... to finish. Confirm that Setup successful appears and that the API Key status on the main menu is Configured.
On later runs, the command without arguments opens the main menu directly. Select Configure API Key → Update API Key to replace or revalidate the key. The option is labeled Enter API Key only when no key has been saved. Do not add arguments or subcommands when running the Helper, and do not bypass the interactive menus.
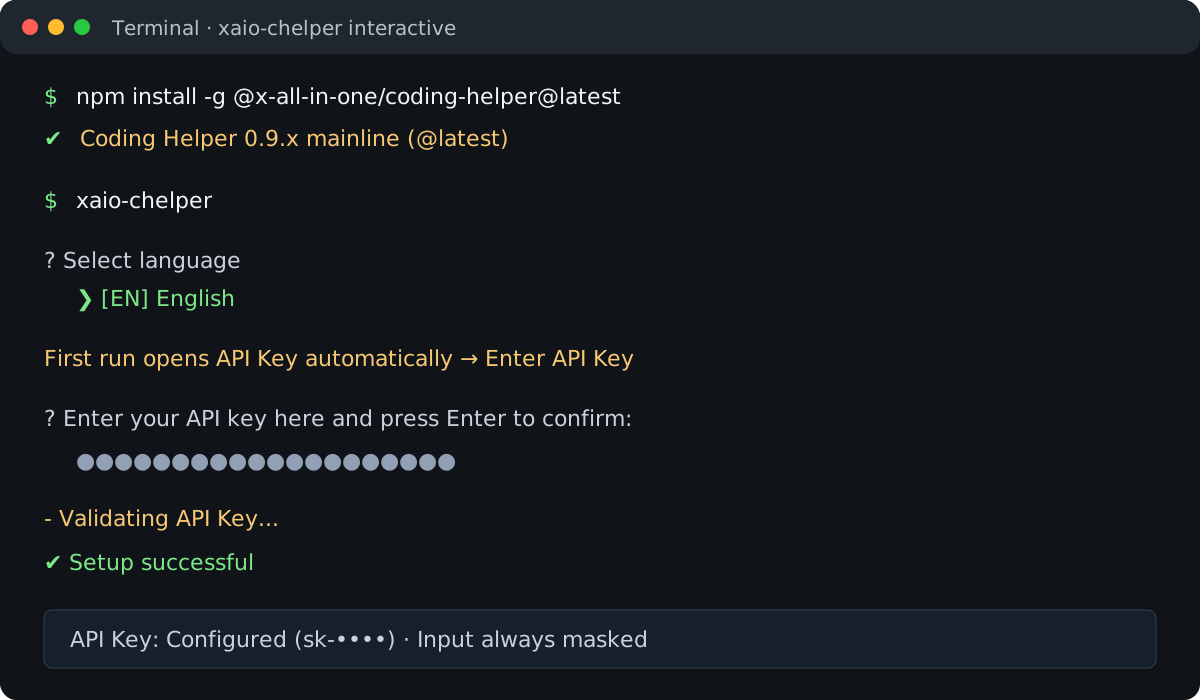
The Helper validates the key and retrieves available models from https://llm-api.x-aio.com/v1/models. Its own configuration is stored in ~/.xaio-chelper/config.yaml by default. Do not commit this file to a repository or synchronize it to a public location.
6. Configure the OpenClaw primary model with the Helper
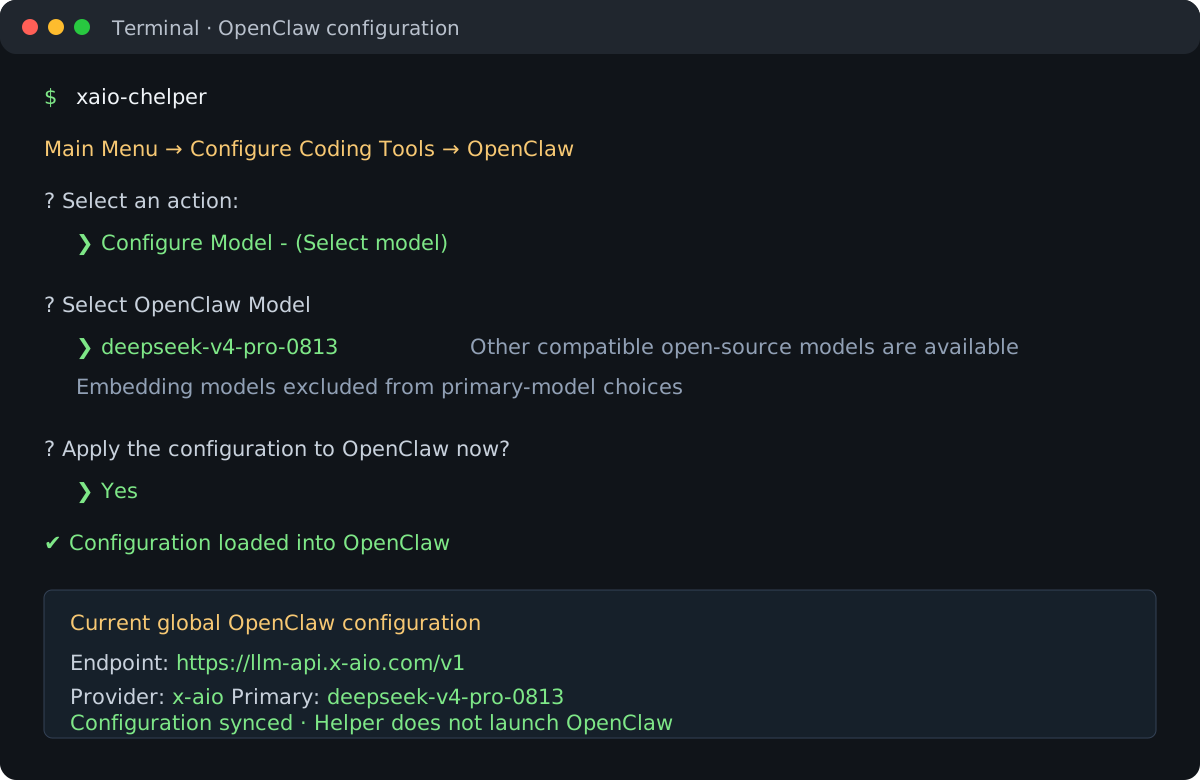
From the Helper main menu, select each item in this path:
- Select Configure Coding Tools.
- Select OpenClaw from the tool list.
- In the OpenClaw management menu, select Configure Model - (Select model).
- Wait for the live model list to load. On the Select OpenClaw Model page, choose
deepseek-v4-pro-0813or another compatible open-source model from the list. - After saving the model, press Enter to accept Yes when prompted with Apply the configuration to OpenClaw now? (Y/n).
deepseek-v4-pro-0813 is the recommended default primary model in the current Helper 0.9.x mainline, not a requirement. The model list comes from the current API key. Select a model ID directly from the list; do not type one manually. The Helper filters out embedding models because they are intended for vector retrieval rather than ordinary chat. Embedding entries are therefore expected to be absent from the OpenClaw primary model list.
You can select another open-source model
Based on speed, capability, context length, and price, you can choose another compatible open-source model from the live list for OpenClaw. Review the X-AIO Model Center, then use the list retrieved by the Helper as the source of truth. If a model has both chat and embedding variants, select only the conversational variant.
After you select Yes, the Helper writes the X-AIO provider and primary model to the global OpenClaw configuration. When it returns to the management menu, verify the following:
- The endpoint is
https://llm-api.x-aio.com/v1. - The provider is
x-aio. - The primary model is the ID you selected.
- The status is Configuration synced.
If you selected No when saving or the management menu reports an inconsistent configuration, select Load Configuration or Refresh Configuration, depending on the current status. The OpenClaw management menu does not include a Launch Tool entry, although other management actions such as unload and update may still appear. Synchronizing the configuration does not launch OpenClaw.
Core fields written by the Helper
The default configuration file is ~/.openclaw/openclaw.json. If you use an officially supported OPENCLAW_CONFIG_PATH, OPENCLAW_STATE_DIR, OPENCLAW_HOME, or OPENCLAW_PROFILE, the actual path depends on your environment. The Helper manages these fields:
models.providers.x-aio.baseUrl       https://llm-api.x-aio.com/v1
models.providers.x-aio.apiKey        your API key (always masked in the page and terminal)
models.providers.x-aio.api           openai-completions
models.providers.x-aio.models        catalog of currently available non-embedding models
agents.defaults.model.primary        x-aio/<the model ID you selected>
These lines are read-only reference information. Do not manually edit them as a substitute for the interactive menus. The Helper preserves an existing valid OpenClaw SecretRef. Configurations that contain $include and Nix-managed configurations with OPENCLAW_NIX_MODE=1 are protected as read-only. The Helper also leaves channel credentials, memory search settings, and other providers unchanged.
7. Start a conversation in your own channel
The official onboarding process installed the OpenClaw daemon; the Helper wrote only the model configuration. Now open the channel you configured in Section 3 on your own account, such as Telegram, Discord, Slack, or WebChat:
- Confirm that the account has completed channel sign-in, pairing, or allowlist authorization. Send
/newas a separate message in the channel and wait for OpenClaw to confirm the new session. For an unauthorized sender,/newmay be ignored or treated as plain text. - After the new session is confirmed, send your question or task directly. For example: "First explain which tools you can access. Do not modify any files."
- Continue the conversation in the same channel. Send
/newagain whenever you need to clear the context.
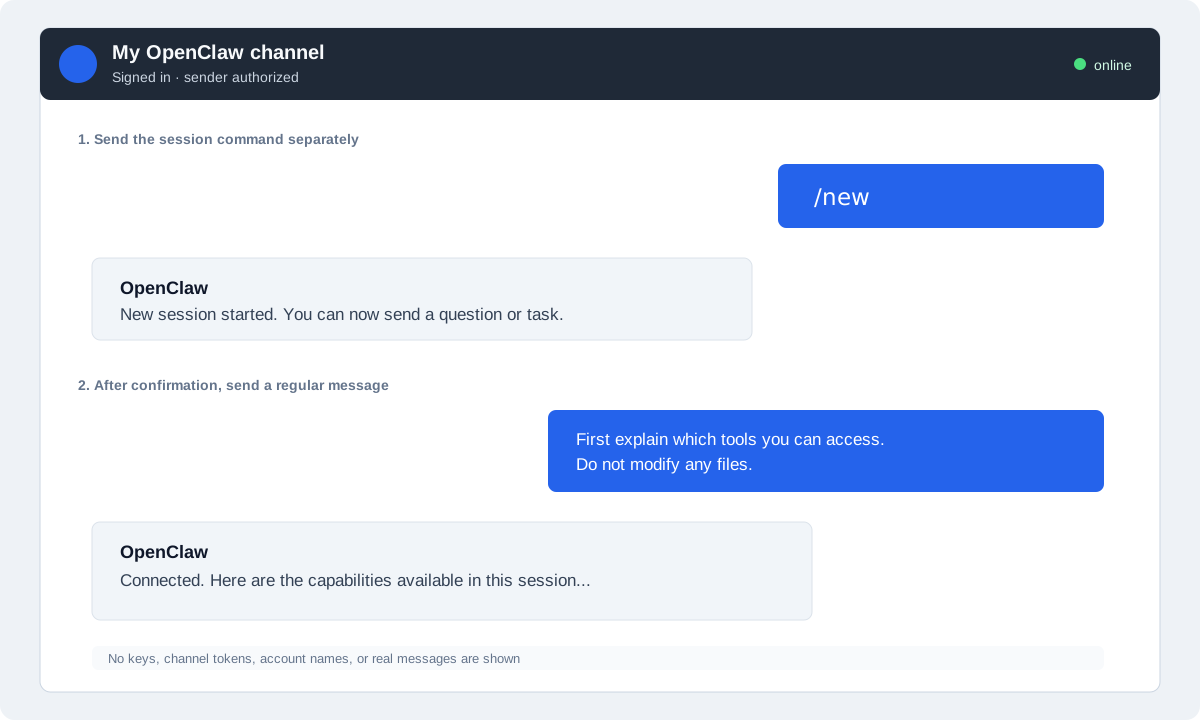
This guide does not replace a channel conversation with a one-time local call, and it does not turn channel messages into terminal commands. This approach verifies the real channel, daemon, API key, and model path while preserving OpenClaw's session boundaries.
Troubleshooting
The Helper reports an invalid API key
Return to X-AIO API Key Management and confirm that you clicked Copy API Key on the target row rather than copying the masked text. Check the key's status and expiration, run xaio-chelper without arguments again, and select Configure API Key → Update API Key to paste it again. Never send the key to support staff.
The OpenClaw model list is empty or a model is missing
First confirm that the API Key status on the Helper main menu is Configured and that your network can reach https://llm-api.x-aio.com/v1/models. In the OpenClaw management menu, select Refresh Model List - (Update available models in configuration), then reopen Configure Model - (Select model). Embedding models are intentionally excluded; their absence does not indicate a loading failure.
The management menu reports an inconsistent configuration
Confirm that OpenClaw is not managed by $include or Nix and that you are not editing the configuration while the Helper writes it. Run xaio-chelper without arguments and select Configure Coding Tools → OpenClaw → Refresh Configuration. If an included file owns the configuration, edit the source file according to the OpenClaw documentation, then return to the Helper to read its status.
The channel does not respond to /new
Confirm that the sending account and channel exactly match your onboarding selections, then check the channel's official connection status, bot permissions, and daemon status. Do not use a one-time local call as a substitute for the channel test. Follow the OpenClaw channel documentation when configuring channel tokens or permissions.
Replace the model or API key
Run xaio-chelper without arguments and select Configure API Key → Update API Key or Configure Coding Tools → OpenClaw → Configure Model. Complete the interactive selection and select Yes to apply it. Do not edit openclaw.json or ~/.xaio-chelper/config.yaml directly.
Clean up after testing
- Delete the tutorial-only key from the X-AIO API key list and confirm the deletion.
- Remove unused channels or bot tokens in the official OpenClaw settings.
- Clear sensitive values from clipboard history, temporary password manager entries, and terminal scrollback.
- For long-term use, create separate time-limited keys for each device or purpose and rotate them regularly.