
Manually Configure X-AIO in WorkBuddy
A step-by-step guide to adding a custom X-AIO model in WorkBuddy without Coding Helper.
WorkBuddy is an AI workspace for individuals and teams that lets you switch between models in a single interface. This guide covers standard manual configuration: you enter the X-AIO endpoint, API key, and model ID directly in WorkBuddy's model settings. You do not need to install or run Coding Helper.
To load every X-AIO model currently available to you at once with the Coding Helper 0.9.x mainline, see Configure WorkBuddy with Coding Helper. This guide retains the complete manual process for users who do not want to install the Helper or who need only one model.
The examples use WorkBuddy v5.3.14. Button locations may vary slightly between versions, but the configuration flow under Settings → Models → Add Model remains the same.
Before you begin
You will need:
- A computer that can run WorkBuddy;
- WeChat or another login device that can confirm a QR code sign-in;
- An X-AIO account with available credit and permission to create API keys.
Official resources:
Security reminder
Treat an API key like a password. Paste it only into the WorkBuddy client on your own device. Do not include it in group chats, support tickets, or screenshots. All screenshots in this guide conceal the key.
1. Install and sign in to WorkBuddy
- Open the WorkBuddy website and download the installer for your operating system.
- Launch WorkBuddy after installation. A sign-in page appears the first time you open the app.
- Scan the QR code with your phone and confirm the sign-in on the phone. Wait for the desktop app to open the workspace automatically.
- You are signed in when the left navigation and chat area appear. If the QR code expires, refresh it and scan the new code.
This guide requires you to sign in only to WorkBuddy itself. Do not enter your WeChat password or any other account password in the model settings.
2. Create a short-lived API key in X-AIO
2.1 Open the key management page
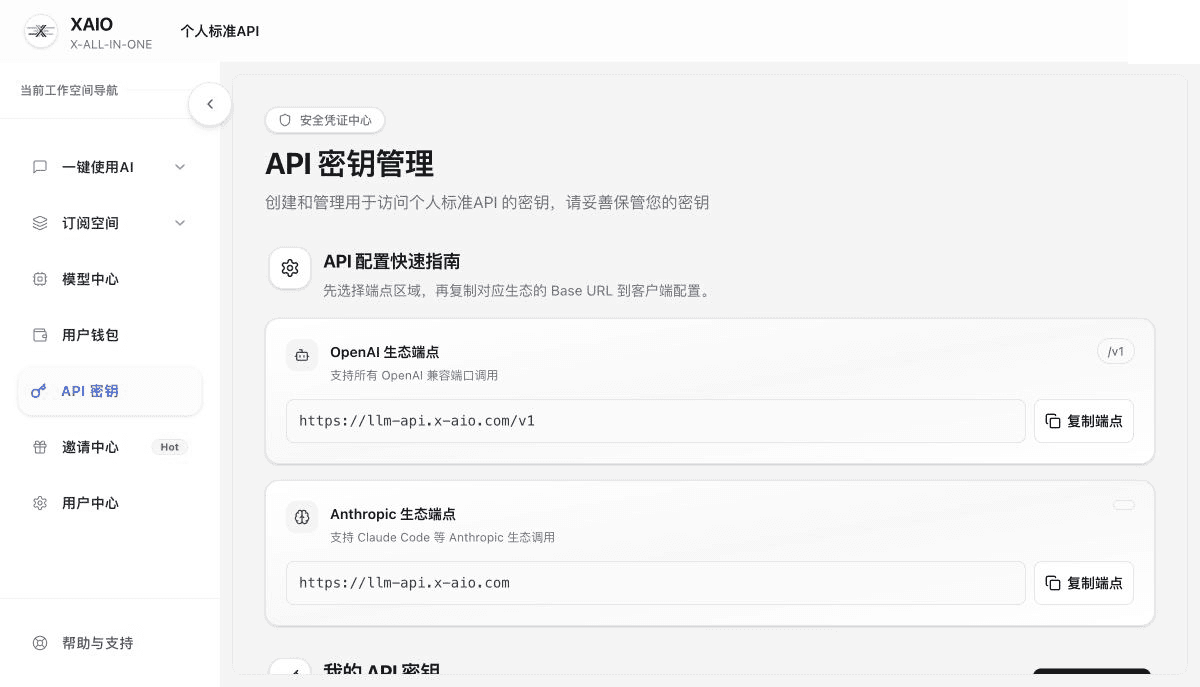
Open X-AIO API Keys in a browser, sign in, and go to the API Keys page. The OpenAI-compatible endpoint at the top of the page displays the Base URL for compatible clients.
2.2 Create a dedicated key
In the My API Keys section, click Create API Key and enter the following information:
| Field | Recommended value | Notes |
|---|---|---|
| Key purpose | WorkBuddy tutorial example - date | Makes the key easy to identify and delete later; do not enter a real password |
| Expiration | 7 days or another short period | Limits the impact of a leak when the key is used only for testing |
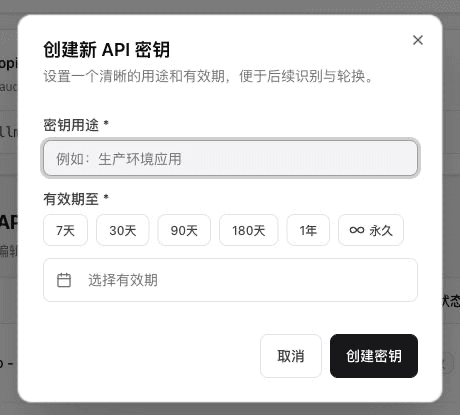
Click Create Key, then click OK in the success message to return to the key list. A new key is not available only at the moment of creation: find the row you just created and click Copy API Key. If you need to inspect it manually, click Show API Key, verify it, and hide it immediately. Copy it only when you are ready to enter it in WorkBuddy, and clear your clipboard as soon as you have pasted it. Never put the complete key in tutorial screenshots, chat history, or plain-text files.
After the key is created, the list displays its name, masked value, status, and expiration. The following image uses a seven-day key as an example. The key cell is fully obscured to avoid exposing even its fingerprint.

Do not select a permanent key
This guide only verifies that WorkBuddy can call a model successfully. Delete this dedicated key after testing. For regular long-term use, create separate keys for each device or purpose as well.
3. Understand the two URLs
The X-AIO page displays a Base URL, while WorkBuddy's Endpoint URL field requires the complete chat completions endpoint. The two values differ as follows:
Base URL (used to confirm the service endpoint)
https://llm-api.x-aio.com/v1WorkBuddy endpoint URL (paste this into the field)
https://llm-api.x-aio.com/v1/chat/completionsDo not add /v1 twice or leave a trailing space. If the X-AIO dashboard displays a new endpoint in the future, use the Base URL currently shown there and append /chat/completions.
4. Add a custom model in WorkBuddy
4.1 Open the model settings
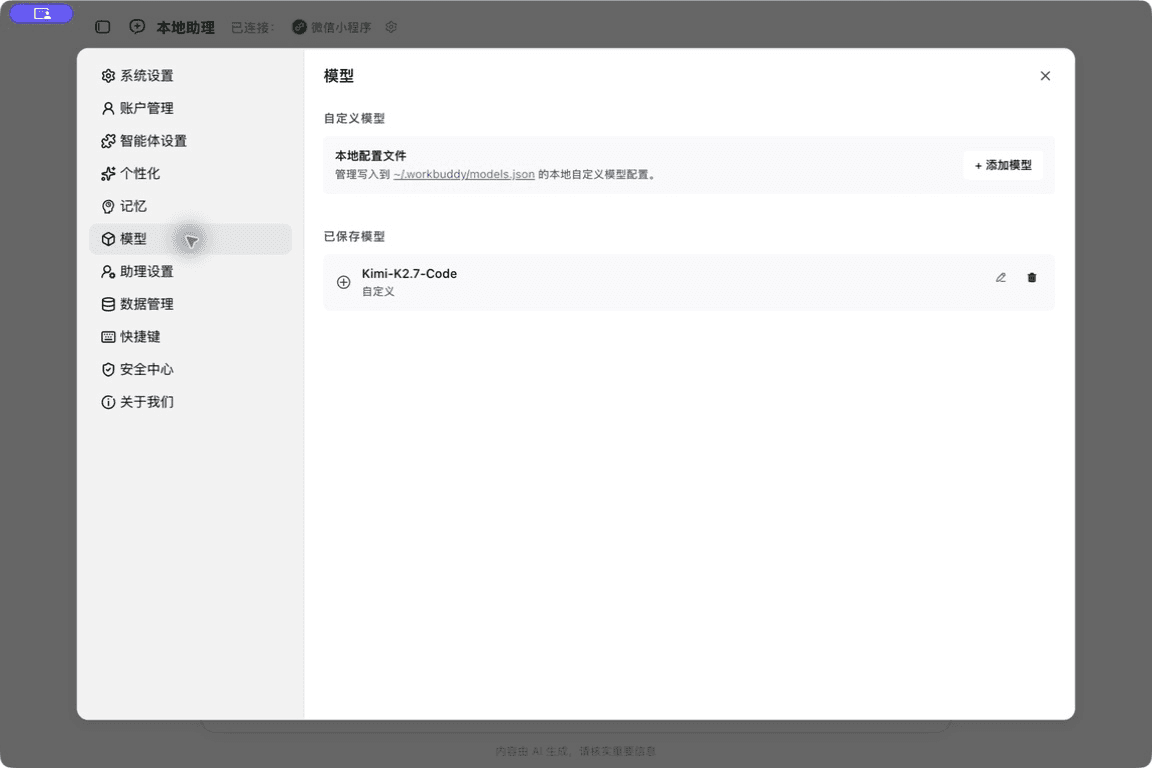
Return to WorkBuddy, click the user entry point in the lower-left corner, click Settings, and open Models in the left sidebar. Click + Add Model in the upper-right corner.
4.2 Enter the model information
Adding and editing a model use the same fields. Enter the values in the table below. The WorkBuddy configuration screenshot later in this section shows the final verification after reopening the saved model, so its window title says "Edit Model." The same fields appear when you add the model for the first time. The API key appears only as dots in the screenshot, which is the correct masked state.
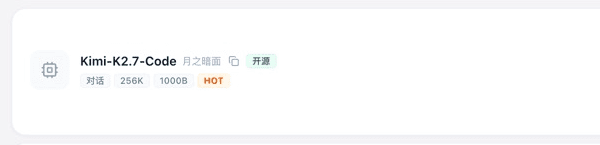
First open the X-AIO Model Center, find the model you want, and click the copy icon next to its name to copy the complete model ID. The image below uses Kimi-K2.7-Code as an example. Do not type the ID manually or change its capitalization. You may choose another compatible open-source model based on speed, capability, and price. The models currently available to your account are authoritative.
| WorkBuddy field | Value |
|---|---|
| Provider | Custom |
| Endpoint URL | https://llm-api.x-aio.com/v1/chat/completions |
| API Key | Paste the short-lived X-AIO key you just created |
| Model Name | Paste the model ID you just copied; this guide uses Kimi-K2.7-Code |
| Tool Calling | Enable as needed; you can leave it enabled for the first test |
| Image Input, Reasoning Mode, Custom Protocol | Leave disabled initially unless the model or task requires them |
| Input, Output | Keep Use provider defaults; no manual values are needed |
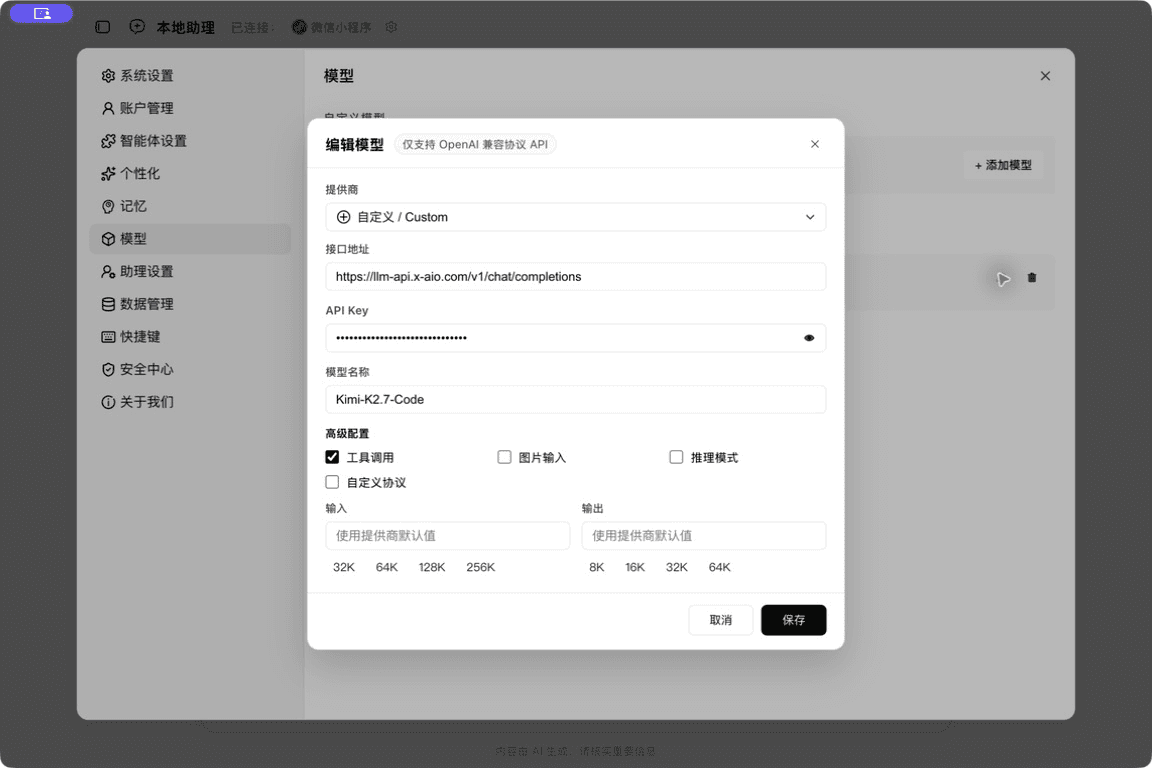
Click Save. The model and a Custom label should appear in the model list.
The model name must match exactly
Model names are case-sensitive, and you cannot replace the Model Center display name with your own nickname. When copying a model ID, copy only the text itself, without surrounding quotation marks, spaces, or code fences. If you receive a "model not found" error, copy the value again before trying anything else.
5. Select the model and complete your first chat
- Click the × in the upper-right corner of the settings window. If WorkBuddy does not open a blank chat automatically, click the + in the upper-left corner to create one.
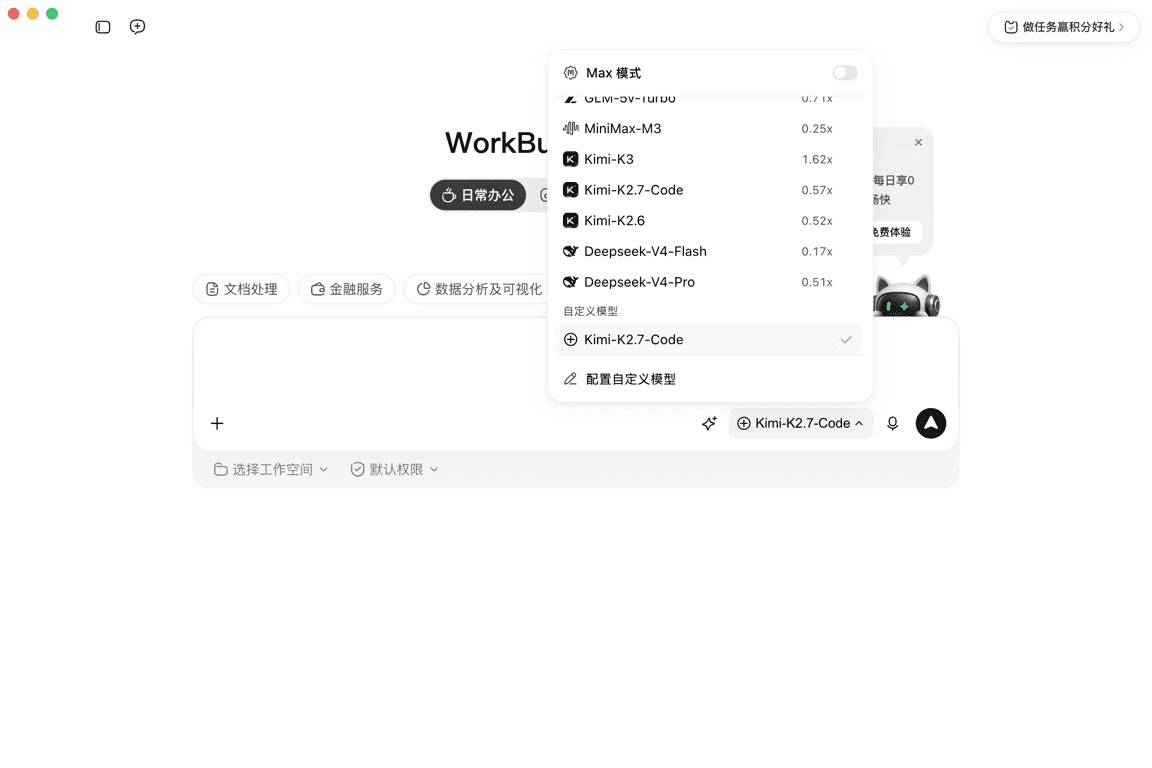
- Click the current model name in the lower-right corner of the input box. Some versions display
Autoby default. - Open the Custom group in the model picker and select the model you saved, such as
Kimi-K2.7-Code.
- Confirm that
Kimi-K2.7-Codeappears in the lower-right corner of the input box, then send a simple test message, such as:
Reply OK- Wait for the model to respond. If the chat area shows a normal response and
Kimi-K2.7-Codeappears below it, WorkBuddy can successfully reach the model with your API key and endpoint URL.
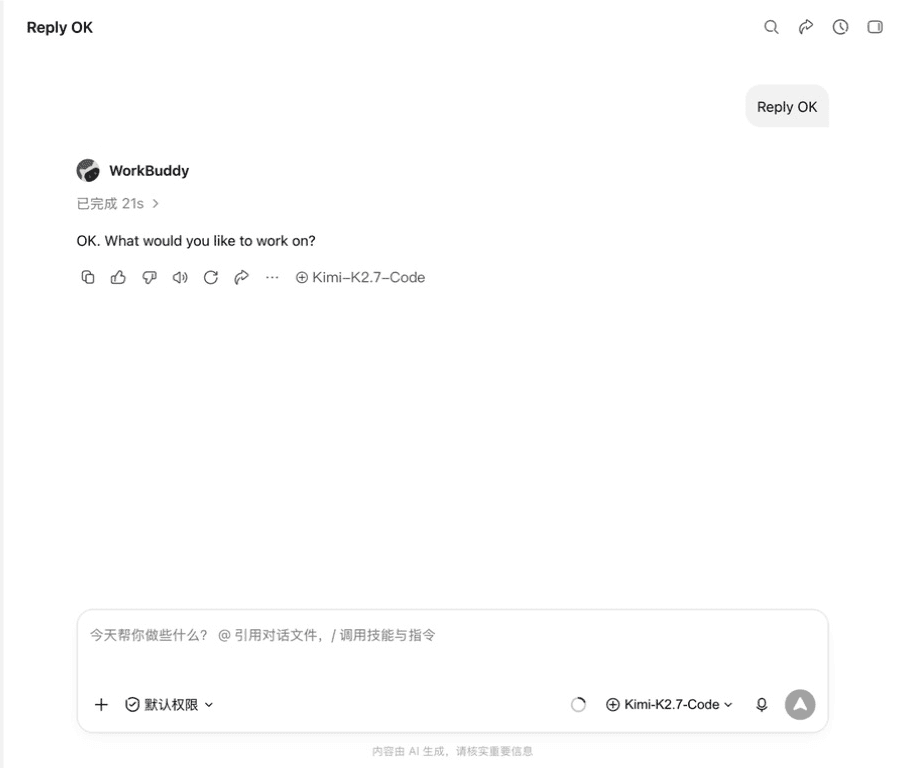
After you send Reply OK, expect a normal response such as OK. What would you like to work on?, with the selected custom model name displayed beneath it. The API key is hidden in the example image. Use your own response and model label as the source of truth.
Success criteria
- No red error appears immediately after you send the message.
- The chat displays a model response instead of showing a spinner indefinitely.
- The selected custom model name appears below the response.
Troubleshooting
401, Unauthorized, or invalid API key
Check that you copied the complete key, that it has no leading or trailing spaces, and that it has not expired or been deleted. Do not paste the key into the chat. Return to Settings → Models and edit the custom model instead.
402 or insufficient subscription allowance
Open the Tokens Plan Subscription Overview and check your subscription status and available allowance. Send the test message again after allowance becomes available. Subscription or allowance updates can occasionally take a moment to synchronize.
404, model not found, or route not found
Confirm that the model name comes from the X-AIO Model Center and that the endpoint URL is:
https://llm-api.x-aio.com/v1/chat/completionsCommon mistakes include using the Base URL where the full endpoint is required or entering /v1/v1/....
The request keeps spinning, times out, or never receives a response
Check that your network and proxy connection are stable, then quit and reopen WorkBuddy. Create a new chat, select the saved custom model again, and send Reply OK. If the request still fails, record the error code and time, then check X-AIO service status, available credit, and key validity. Never send your complete API key when contacting support.
The Custom model group is missing
Return to Settings → Models and confirm that the model appears in the saved models list. Close the model picker, reopen it, and select the Custom group. Restart WorkBuddy if necessary in case an older version has not refreshed the model list.
6. Clean up after testing
- On the X-AIO API Keys page, find the key with a name similar to
WorkBuddy example key - date, then delete it and confirm. - Return to Settings → Models in WorkBuddy and delete the custom model configuration you no longer use.
- Remove the test key from your password manager, clipboard history, and temporary text.
- For long-term use, create a separate key for the intended purpose and set an appropriate expiration period. Use different keys for different devices or purposes whenever possible.
After you delete the key, any old local configuration that contains it can no longer call X-AIO. Delete the local WorkBuddy configuration as well to prevent accidental use.